Lab 7: Animation
Table of contents
- Overview
- Making Sprites
- Sprite-based Method
- Modular-based Method
- Supplementary Lecture
- Checkoff Requirement
- Challenge
- Bug Reports
Overview
In this lab, you will be getting a preview of the game animation pipeline, starting with a Photoshop sprite to a finished Unity animation! For this lab, we will be covering both sprite-based and puppet-based animation, as well as some techniques for creating sprite-based animations. However, we won’t go too in depth about how to animate it in Unity, as there is another lab (Animator and Blend Trees) that covers it in more detail–be sure to check that out!
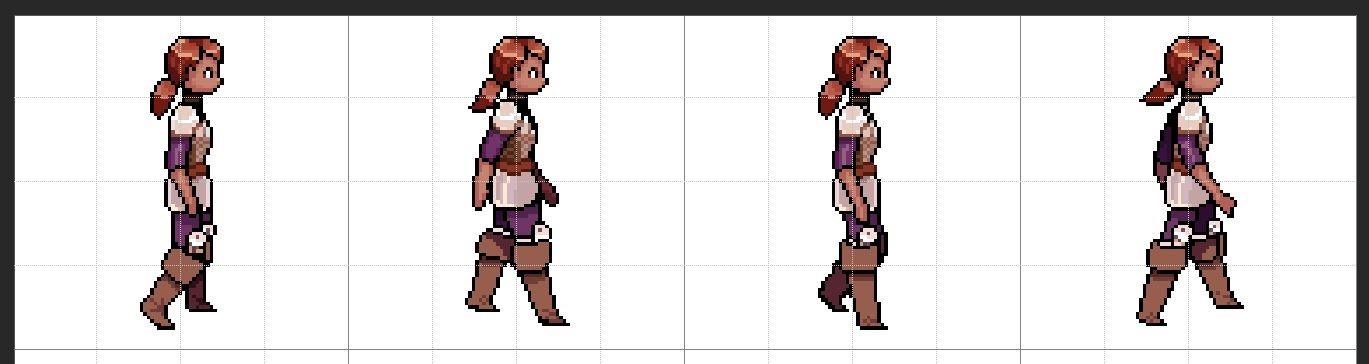
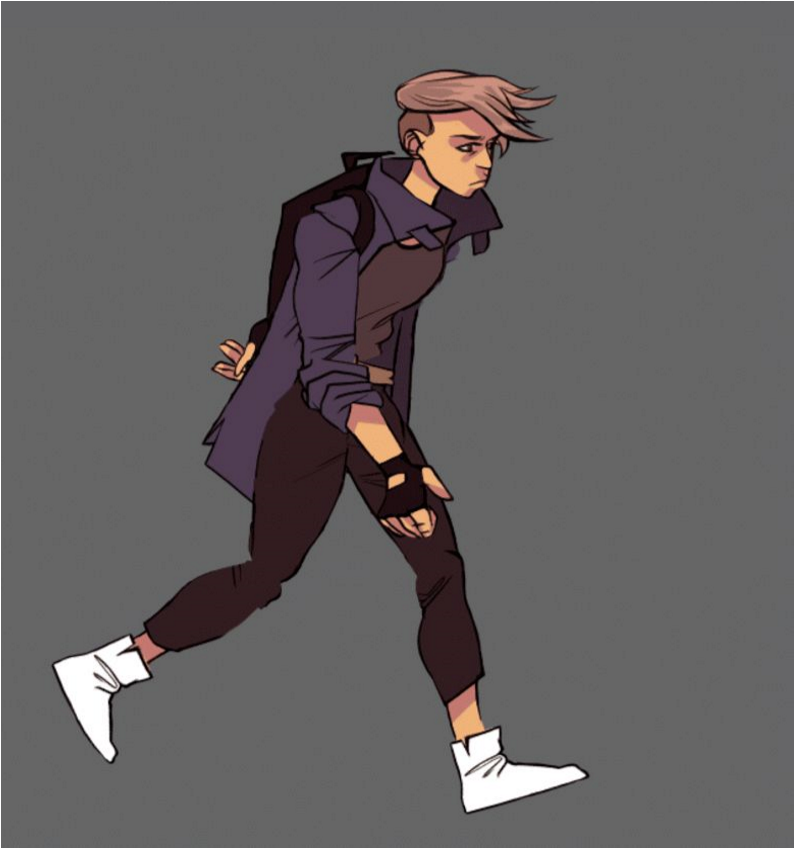
The Sprite-based (or Cast-based) is a type of frame-based animation which involves each frame being drawn individually. Sprite-based animation involves objects that move independently of the background. This is a very popular form of animation and has seen a lot of usage in video games. Frame-by-frame animation generally takes more time per animation frame but gives you much more freedom in your sprites, allowing for more convincing animations.
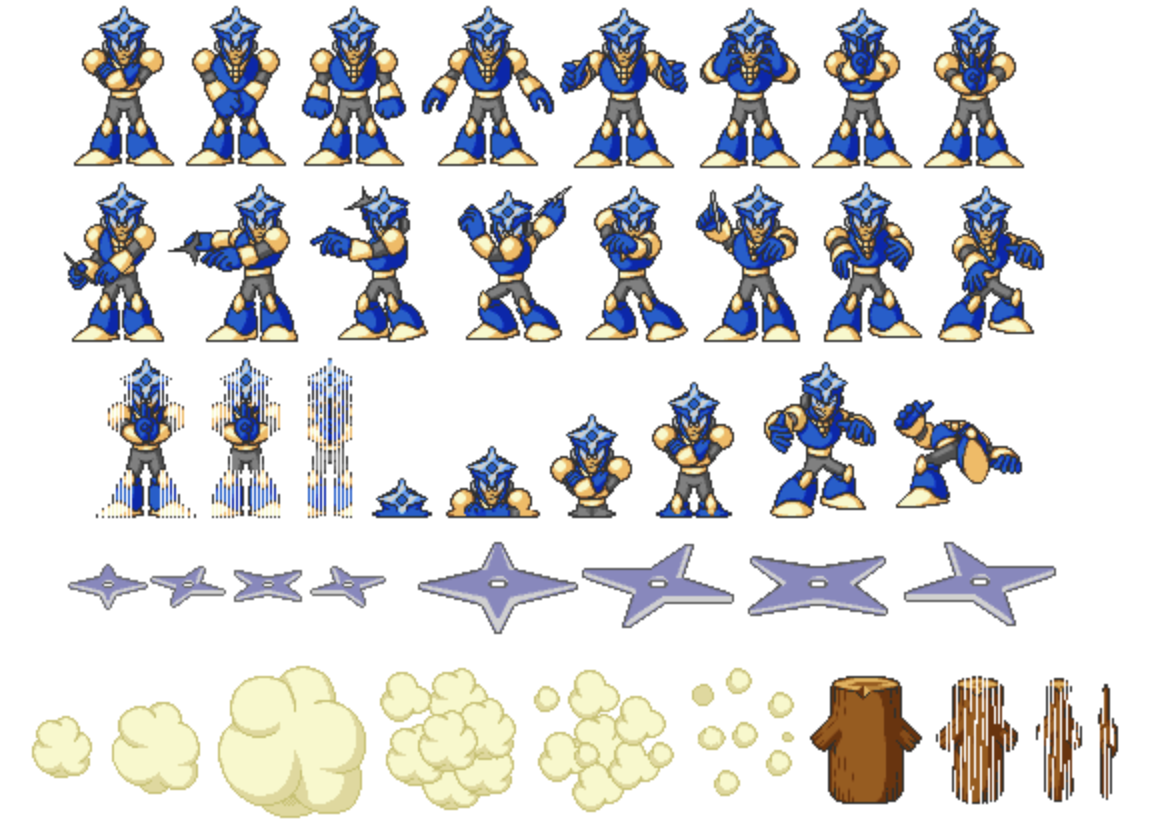 |
|---|
| Example of Sprite-Based animation |
The Modular or Puppet method has more overhead, and is harder to make look realistic, but it is very easily scalable if you have lots of animations. It’s not well-suited to low-resolution or pixel animations, although there are ways of making it work. [Warning: This method may take you longer than the sprite-based method, depending on the complexity of your model. It’s only recommended if you are comfortable with sprite-based animations.]
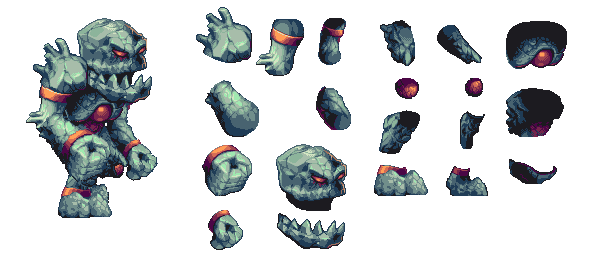 |
|---|
| Example of Modular-Based animation |
The lab checkoff will only require one animation, so pick whichever method works best for you!
Making Sprites
Open a canvas in your preferred drawing software. In this lab, we’ll be making a walk animation. We have provided sprites in the lab file for reference, but artists must draw their own sprites of an existing/original character.
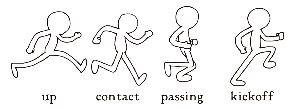
We’ll be doing the passing and up poses. This is just four frames in total (two for each step for the left and right), although for your actual game animations you can (and should!) add frames in between to make the animation more fluid.
We’ll first go over the Sprite-based method. Even if you’re doing the modular-based method, it’s recommended to at least skim through the next part, so that you’re familiar!
Sprite-based Method
Making the Sprites
Keep in mind the 12 principles of animation while you animate to make your animations bouncier, and more believable! Also, don’t be afraid to look up frames online by googling images of insert action animation frames (i.e. walking animation frames) so that you can get an idea of how many frames you need and what each frame should roughly look like.
Photoshop
-
Set up a grid. For the walking animation, we’ll focus on drawing four keyframes (you can use the file labeled sprites.png as a reference to follow in the downloaded lab folder). Start with a blank canvas. If you want to do pixel art, a suggested canvas size would be 256 (width) x 64 (height) pixels or 512 x 128 pixels. Otherwise, you can have a resolution of your choosing, but make sure that the width is four times the height. After you have your canvas in Photoshop, go to
View > Showand make sureGridis checked. Then go toPhotoshop > Settings > Preferences > Guides, Grid & Slicesand changeGridline Every…to the height size. Now, you should have four squares of equal size where you can draw each keyframe! -
Now, on a new layer, draw one keyframe. Use the grid to center the drawing inside the leftmost grid square. With
View > Snapenabled, you can do this by selecting the Move tool and holding Shift as you click and drag the layer vertically or horizontally.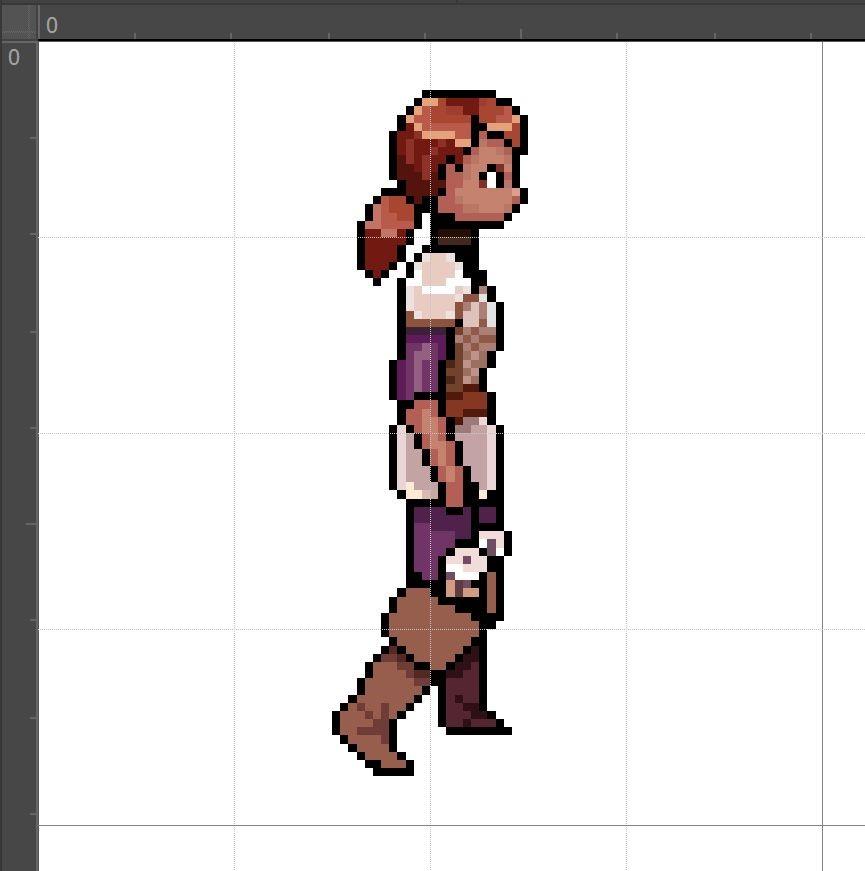
We’ll be making adjustments to this frame for later frames to reduce the amount of work necessary.
-
Draw the other three frames on separate layers. You can do this by copy and pasting your first keyframe three times into adjacent grid squares, then changing parts that need to move. This can save you having to redraw parts like the head and face, which don’t change as much.
Procreate
-
Set up. On a new canvas, go to
Actions(Wrench icon) > Canvashere you can turn on Animation Assist (onion skinning) and Drawing guide (grid).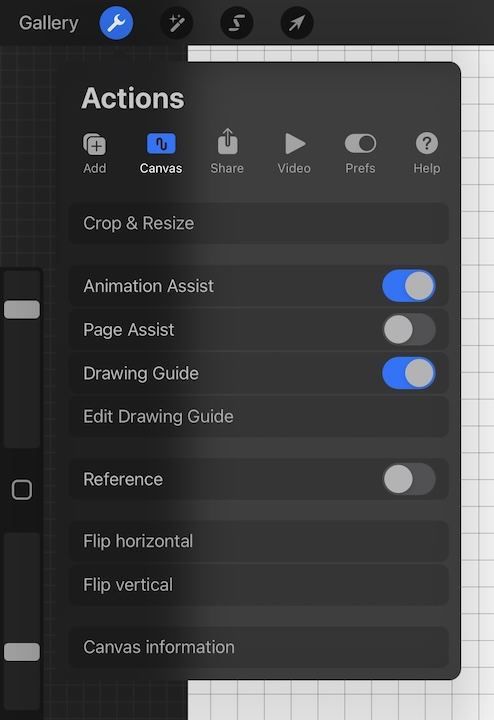
-
Animation Assist has many features that allows users for better animation workflow. One of the features is onion skinning which is used to see previous frames simultaneously, allowing us to create smooth motions.
-
The Drawing Guide sets up the grid on your canvas. Feel free to customize the grid to suit your needs in
Edit Drawing Guide
-
-
Now draw your walk-cycle either with Animation Assist or spaced out evenly with the grid (follow Photoshop method steps 2 and 3 as the pipeline is practically the same).
-
Exporting. When you’re happy with your walk-cycle, it’s time to export by selecting
Actions (Wrench Icon) > Share > Share Image > PNG.
For a transparent background, deselect the background color before exporting as a PNG.
If you had done your walk-cycle using the Drawing Guide (Photoshop method) you’re done and can move on to Importing Sprites. However, if you created your walk-cycle with onion skinning, you’ll find that all your sprites are on top of each other and on different layers! To fix this:
-
Export every layer by
Actions (Wrench Icon) > Share > Share Layers > PNG Files.You can directly import these sprites into Unity without making the sprite sheet. However, sprite sheets are generally more time-efficient and provide better organization. You can read more about this at Why Should I Use A Sprite Sheet?
-
Navigate to any sprite sheet maker and import all of your images. You will end up with a complete sprite sheet PNG of your walk-cycle animation!
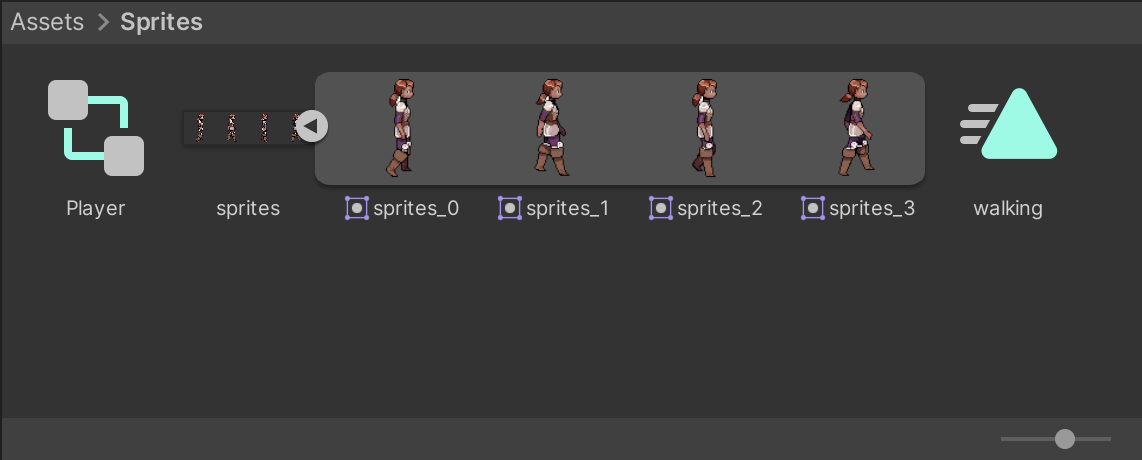
Importing Sprites
-
Create a new 2D Unity project.
- Create a Sprites Folder inside Assets
- You can do this by going to
Assets > Left Click > Create > Folderand naming your new folder Sprites.
- You can do this by going to
- Import
- Inside the Sprites folder, right click the background and select
Import New Asset. Locate and import your sprite sheet.
- Inside the Sprites folder, right click the background and select
- Change Settings
- In the import settings window (right side tab) in the Inspector, find Sprite Mode and change to Multiple. If you are doing pixel art, change Filter Mode to Point (this will prevent your sprites from being blurry). Then, at the bottom, click
Apply.
- In the import settings window (right side tab) in the Inspector, find Sprite Mode and change to Multiple. If you are doing pixel art, change Filter Mode to Point (this will prevent your sprites from being blurry). Then, at the bottom, click
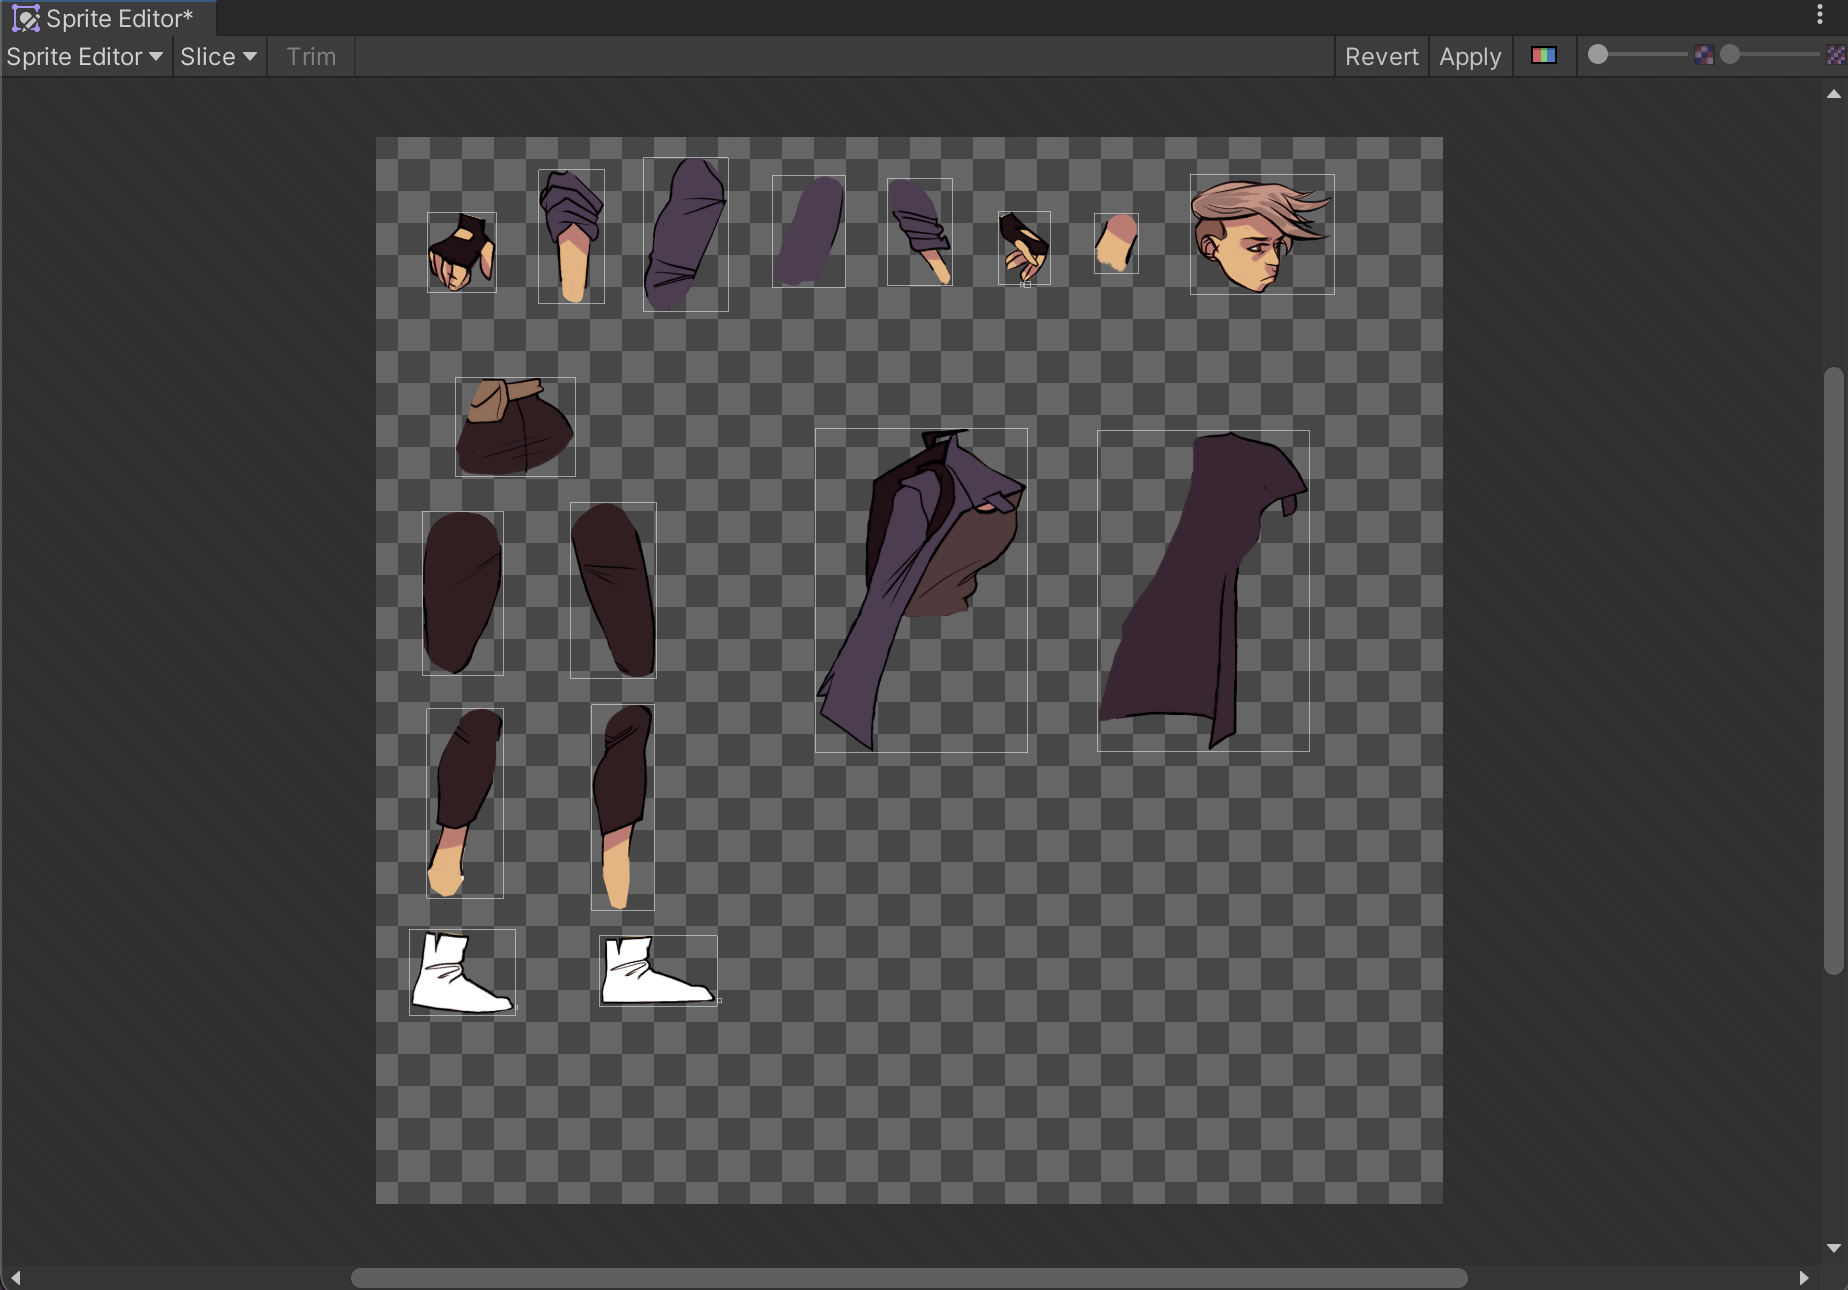
- Sprite Editor
- Frame Based:
- Click
Sprite Editorin the Inspector. In the window that opens, click Slice. Then, in Type, select Grid By Cell Size. Choose the height size that you used to make your canvas size/grid. Then, clickSlice.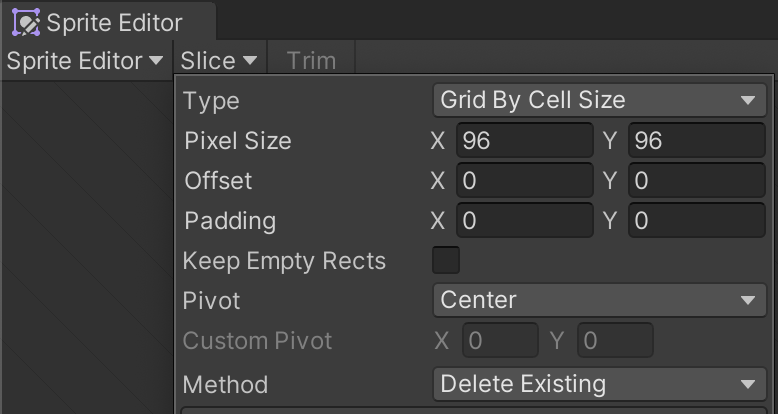
- Click
- Frame Based:
Creating Animations
This part will go by very quickly. We will provide a more in-depth explanation and learn how to animate a sprite to walk in other directions well in a later lab (the Animator and Blend Trees lab).
-
Right click in the Hierarchy and click
Create Empty, let’s name this GameObject “Player.” While the Player object is still selected in the Hierarchy, clickWindow > Animation > Animationto open the Animation window. Then, click Create. This will create a New Clip. Name this clip walking.anim and save (Notice that if you select the Player object in the Hierarchy, an Animator component is automatically added in the Inspector). For future reference, to create more animations, select the box that has your animation name (in this case, walking.anim) and click Create New Clip.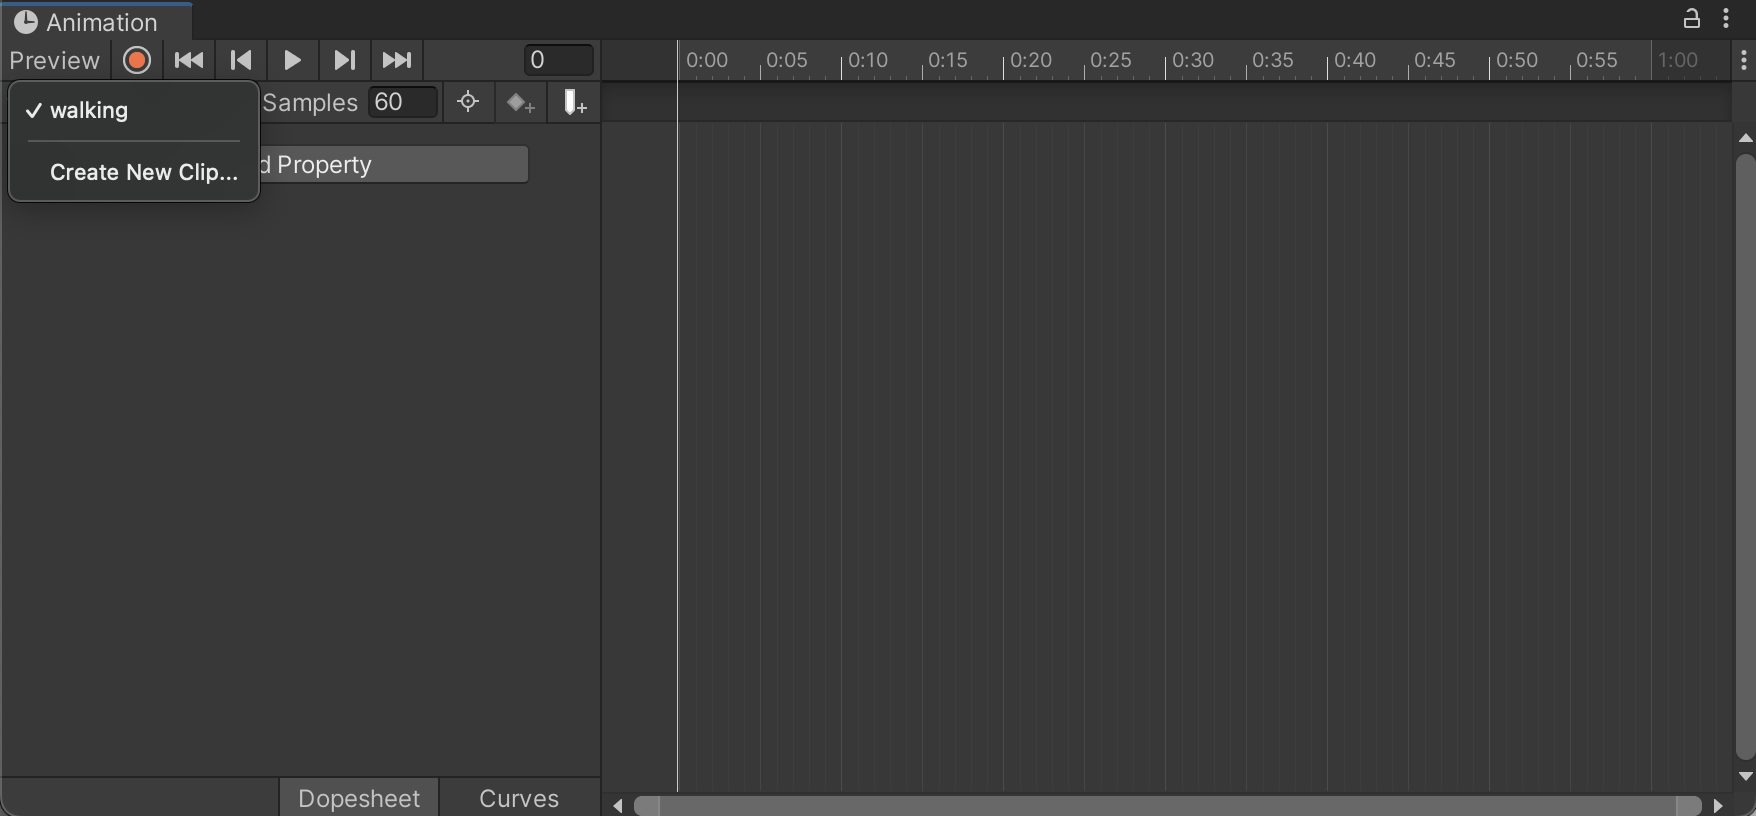
-
Frame Based
-
In the Sprites folder, click on the arrow next to your sprite sheet to expand it.
-
Click and drag each sprite frame from the Sprites folder to the Animation timeline, at 0:10 intervals. Add the last frame twice, 0:10 apart, to prevent a jitter as the animation loops. You should have a total of 5 frame markers. Click the play button in the Animation window to see the animation playing in the Scene. Feel free to adjust the Samples value and the frames’ spacing if the animation is too slow or fast.
-
Congrats, you’re done!
Next, we’ll cover the modular based animation.
Modular-based Method
Making the Sprites
Similar to the sprite based method, there’s a sprite provided for reference and any programmers attempting the lab, but artists must create their own sprites.
- Draw your character. You’ll be separating all their limbs into a big weird body-part sheet later, so pick a pose where the arms, legs, and head are all distinct and make a strong silhouette. Make sure the character is facing either right or left (¾ view can work as well).
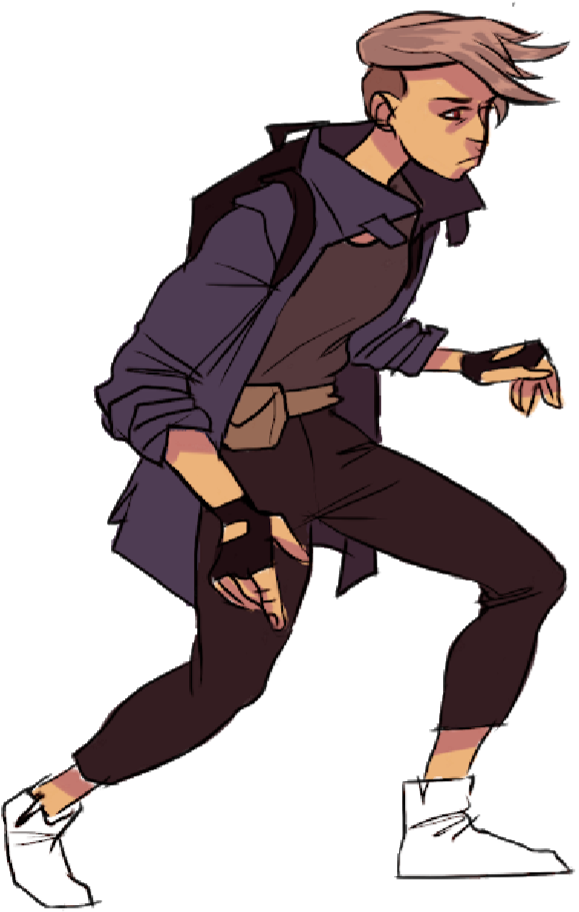
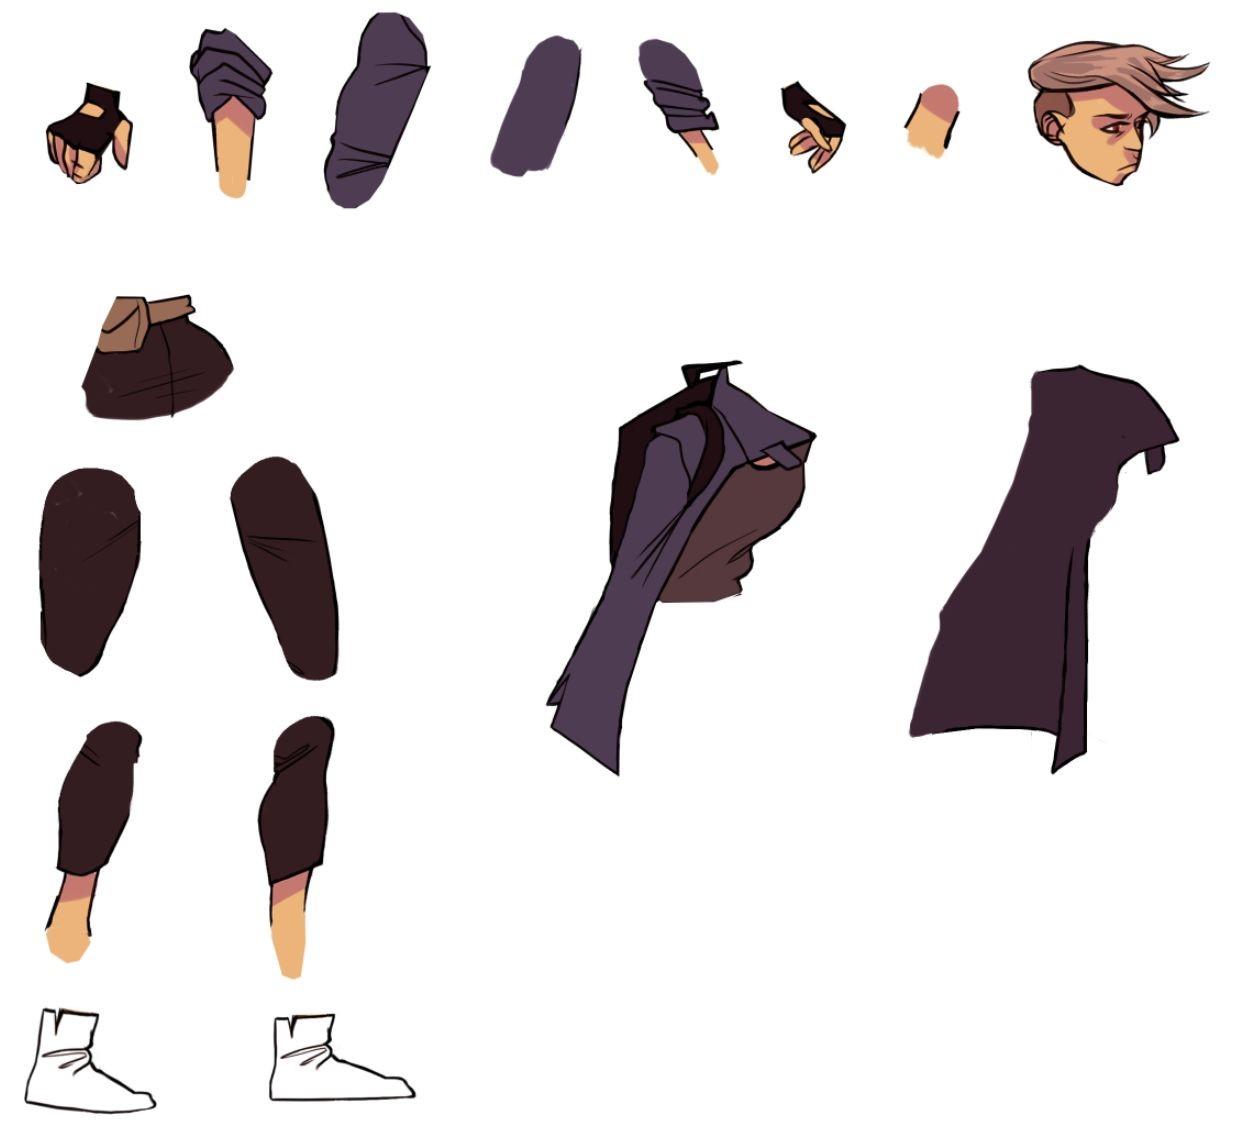
- Modularize. Using the lasso tool (or something similar in the drawing program you use if you don’t use Photoshop) select each significant body part, cut them out of the character, and paste them somewhere on the canvas. At a minimum, you’ll need these parts:
- Head + Torso (Can be one part)
- Right:
- Arm
- Thigh
- Calf + Foot (Can be one part)
- Left:
- Arm
- Thigh
- Calf + Foot(Can be one part)
For some parts, you’ll need to go back and manually extend the lassoed drawing to allow for a smooth range of motion later on (see rounded-off limb ends below). Feel free to be as detailed as you want with the parts, but make sure to leave a lot of white space in between each one!
Importing Sprites
-
Create a new 2D Unity project.
- Create a Sprites Folder inside Assets
- You can do this by going to
Assets > Create > Folderand naming your new folder Sprites.
- You can do this by going to
- Import
- Inside the folder, right click the background and select Import New Asset. Locate and import your sprite sheet.
- Change Settings
- In the import settings window in the Inspector, change Sprite Mode to Multiple. If you are doing pixel art, change Filter Mode to Point (this will prevent your sprites from being blurry). Then click
Apply.
- In the import settings window in the Inspector, change Sprite Mode to Multiple. If you are doing pixel art, change Filter Mode to Point (this will prevent your sprites from being blurry). Then click
Sprite Editor
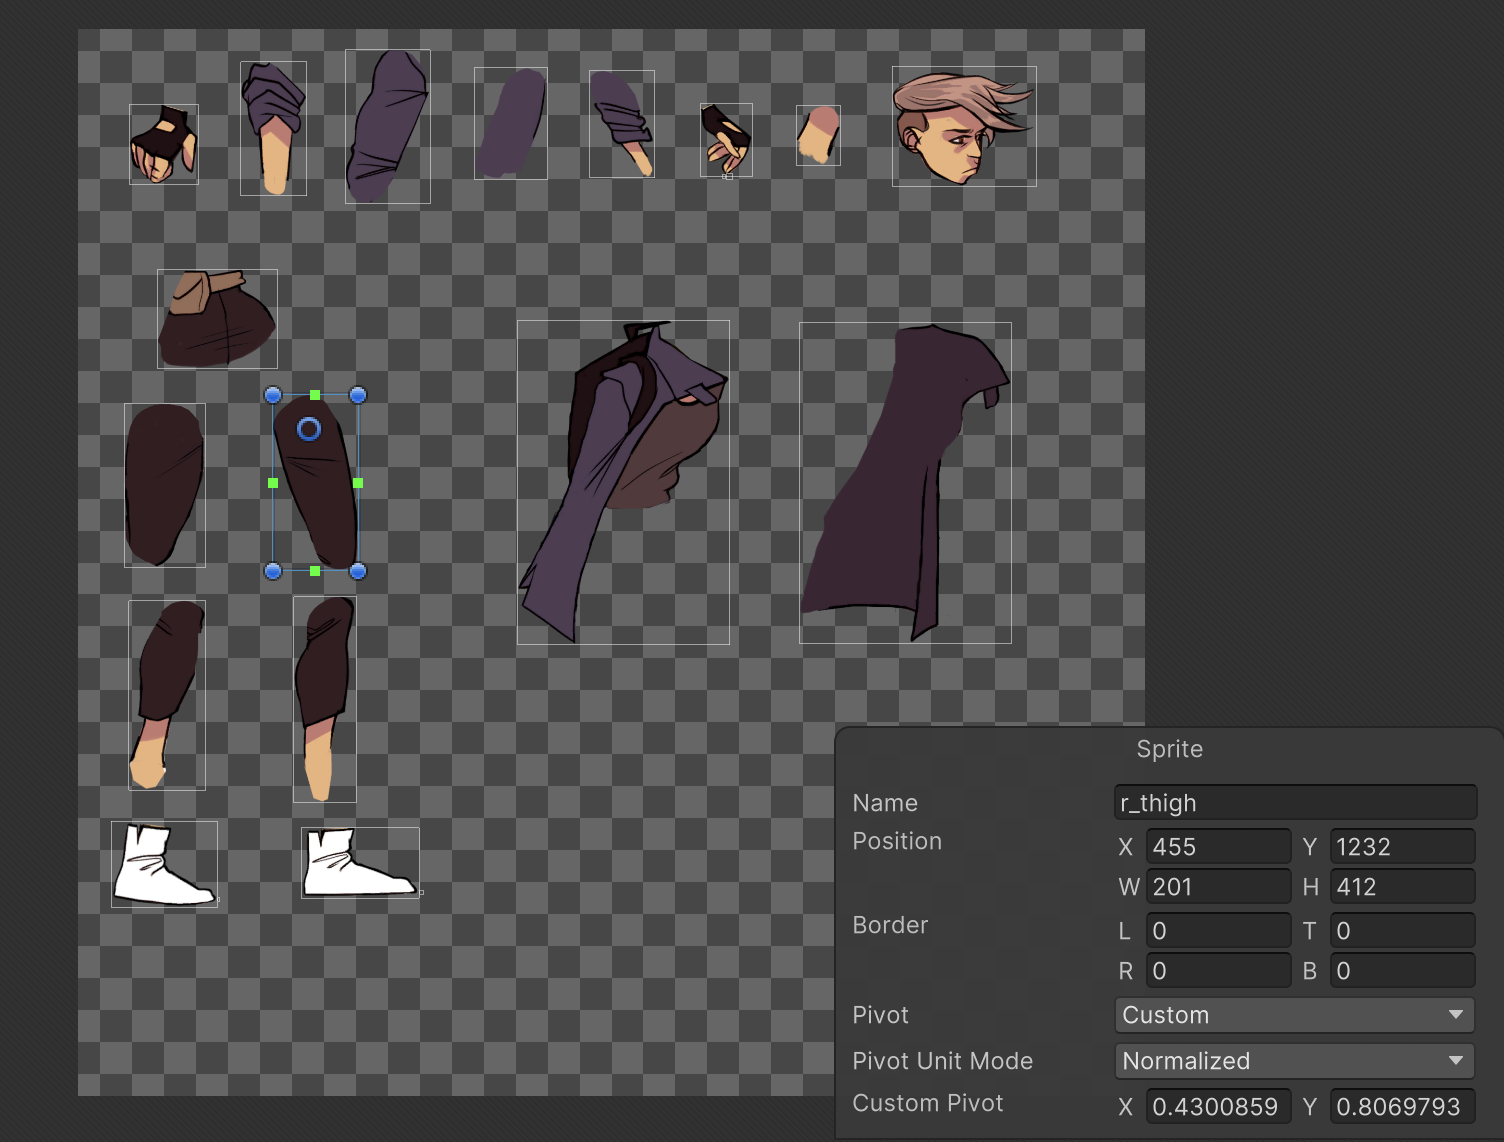
Click Sprite Editor in the Inspector. In the window that opens, click Slice. Make sure the settings are Automatic, Center, and Delete Existing, then click the Slice button at the bottom of the pop-out. This will automatically separate the sprite sheet into individual sprites.
Now, to edit the pivot points so that they resemble joints, click on each part and move the blue circle to its correct pivot location. For example, thighs pivot around the hips, calves pivot around the knee, and arms pivot around the shoulder. You can also set pivots values manually in the Sprite Editor window by entering values in the Custom Pivot box. Make sure you save any changes made to any individual sprite by clicking the Apply button towards the top right side of the Sprite Editor window.
Now is also a good time to name the body parts. As you set pivots, rename each of the body parts with a R or L label and the part name. This will make organization much easier later on.
Creating Animations
-
Right click in the Hierarchy and select Create Empty. Name this empty object PlayerHolder. Create another empty game object, name it Player, and drag it onto PlayerHolder so that it becomes a child. This is so that translations and rotations we make to the character while animating it won’t affect its position in the world space.
-
Expand your sprite sheet in the Sprites folder by clicking on the gray arrow.
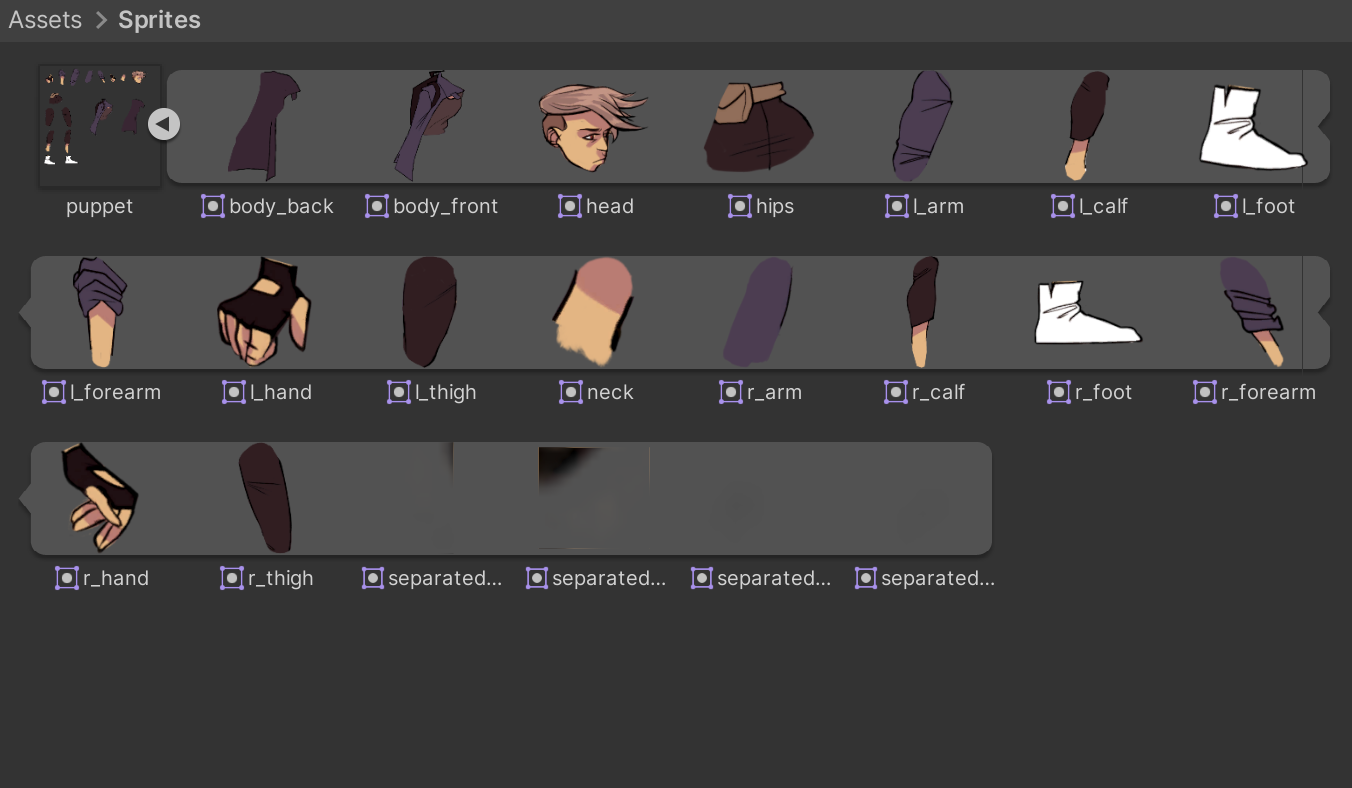
-
Click and drag each body part onto the Scene view to its approximate location.
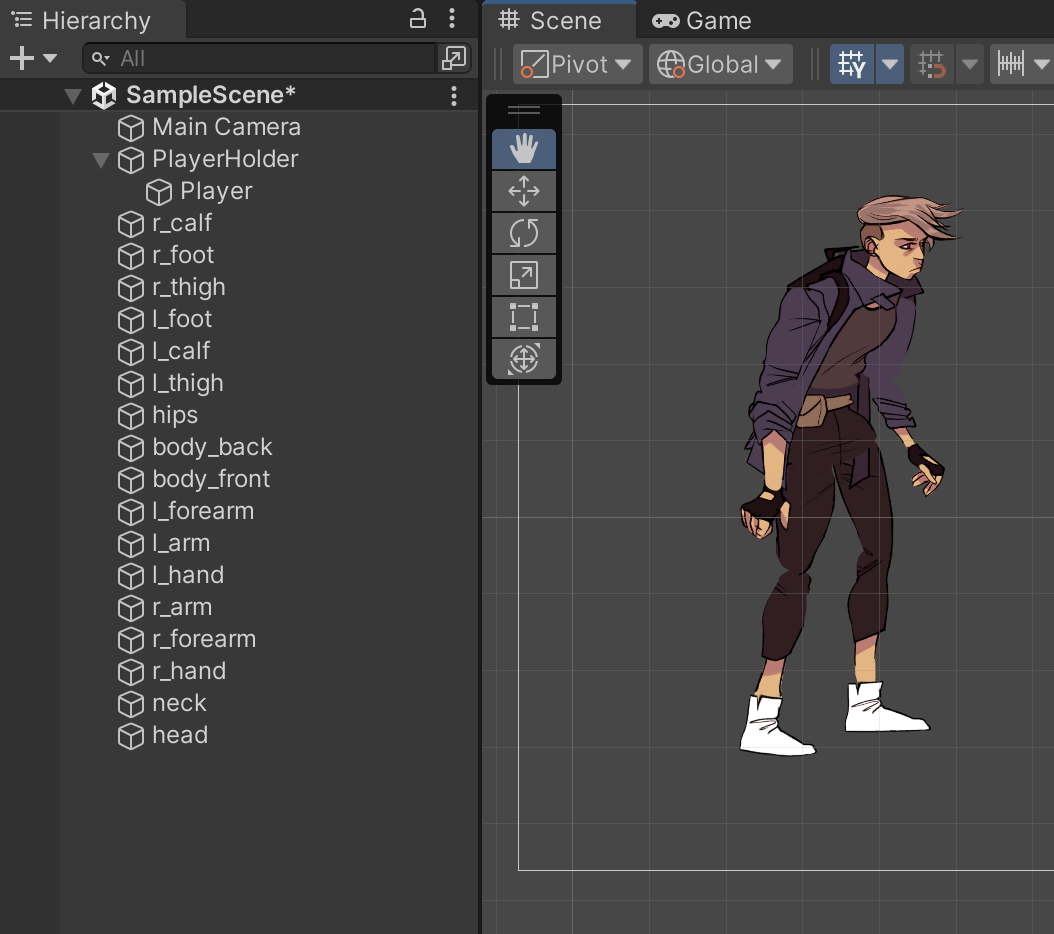 Then rearrange the objects in the Hierarchy with parent-child relationships that roughly follow the organization of a skeleton. For example,
 Hips > Left Thigh > Left Calf > Left Foot. This will make it much easier to animate later, since moving the hips would move everything attached to them at the same time. -
The layer ordering will be messed up, so go to
Edit > Project Settings > Tags & Layersand create a new sorting layer called Player** using the + button under Sorting Layers. Then, select all body parts and in the Sprite Renderer in the Inspector, and change the sorting layer to Player. Now, change body parts’ Order in Layer values to fix the ordering (like below) - objects with a higher Order in Layer value will be displayed above others. Take this time to also adjust the positioning of all body parts so that your character looks right. On the toolbar left of the Play Button, make sure that Toggle Tool Handle Position is set to Pivot. This will allow you to rotate your body parts according to your custom pivot points.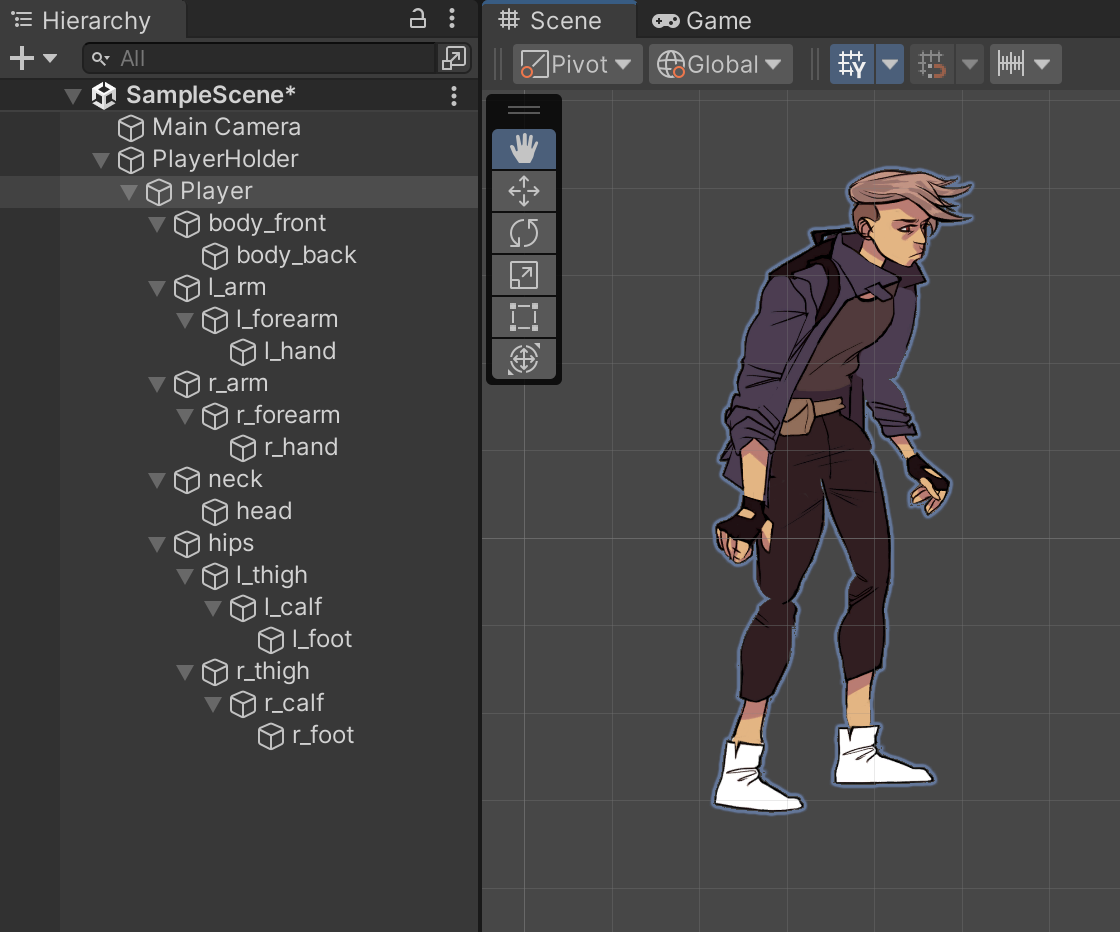
-
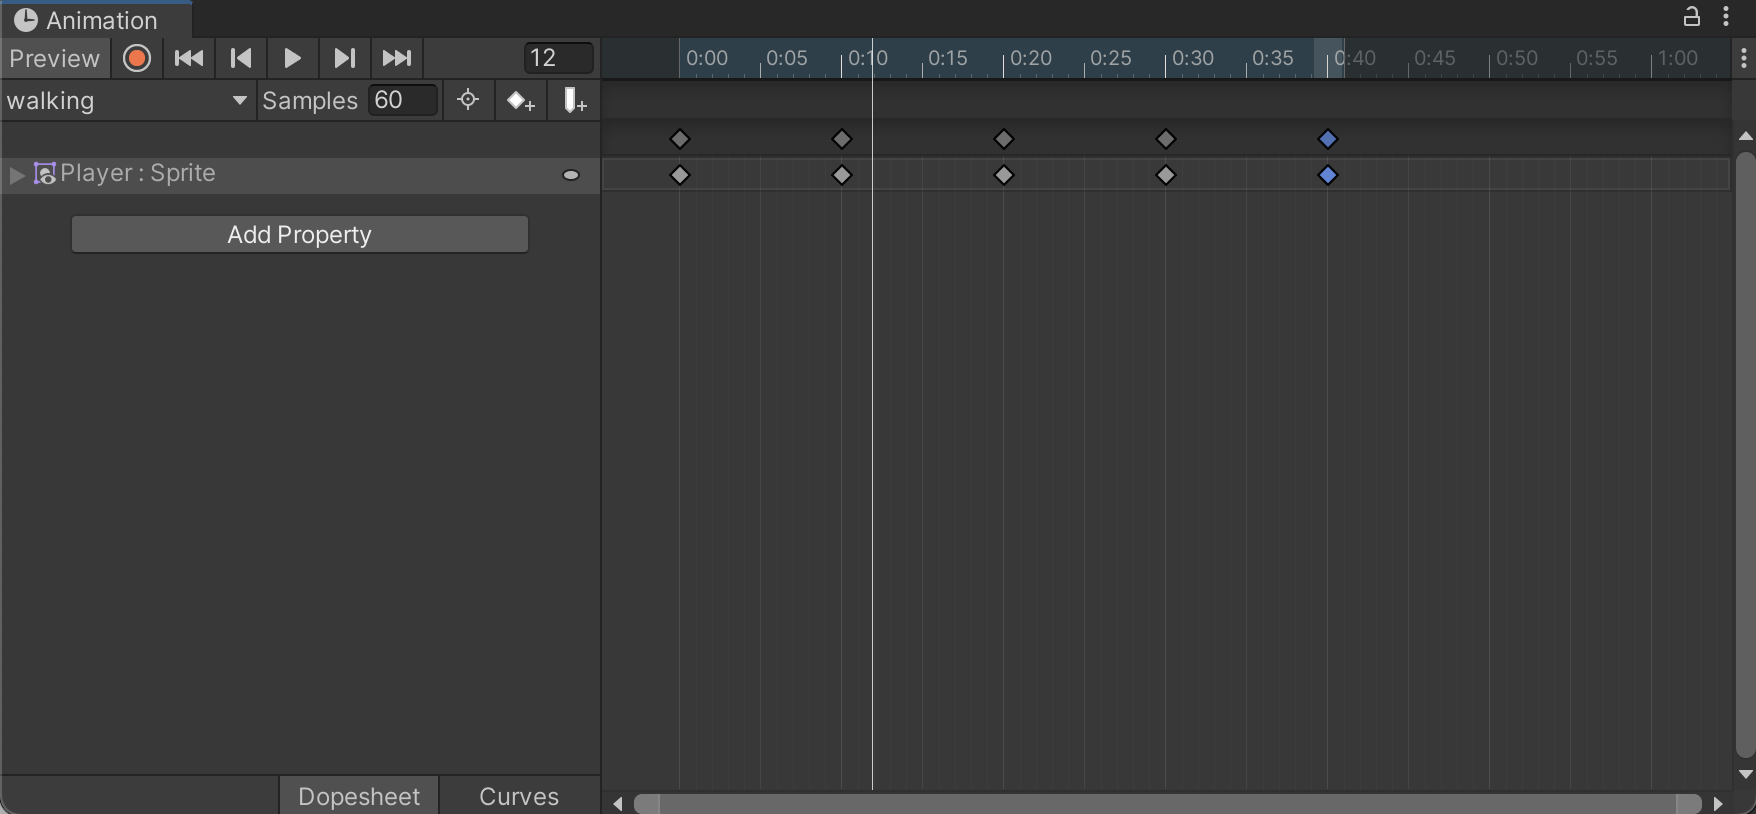
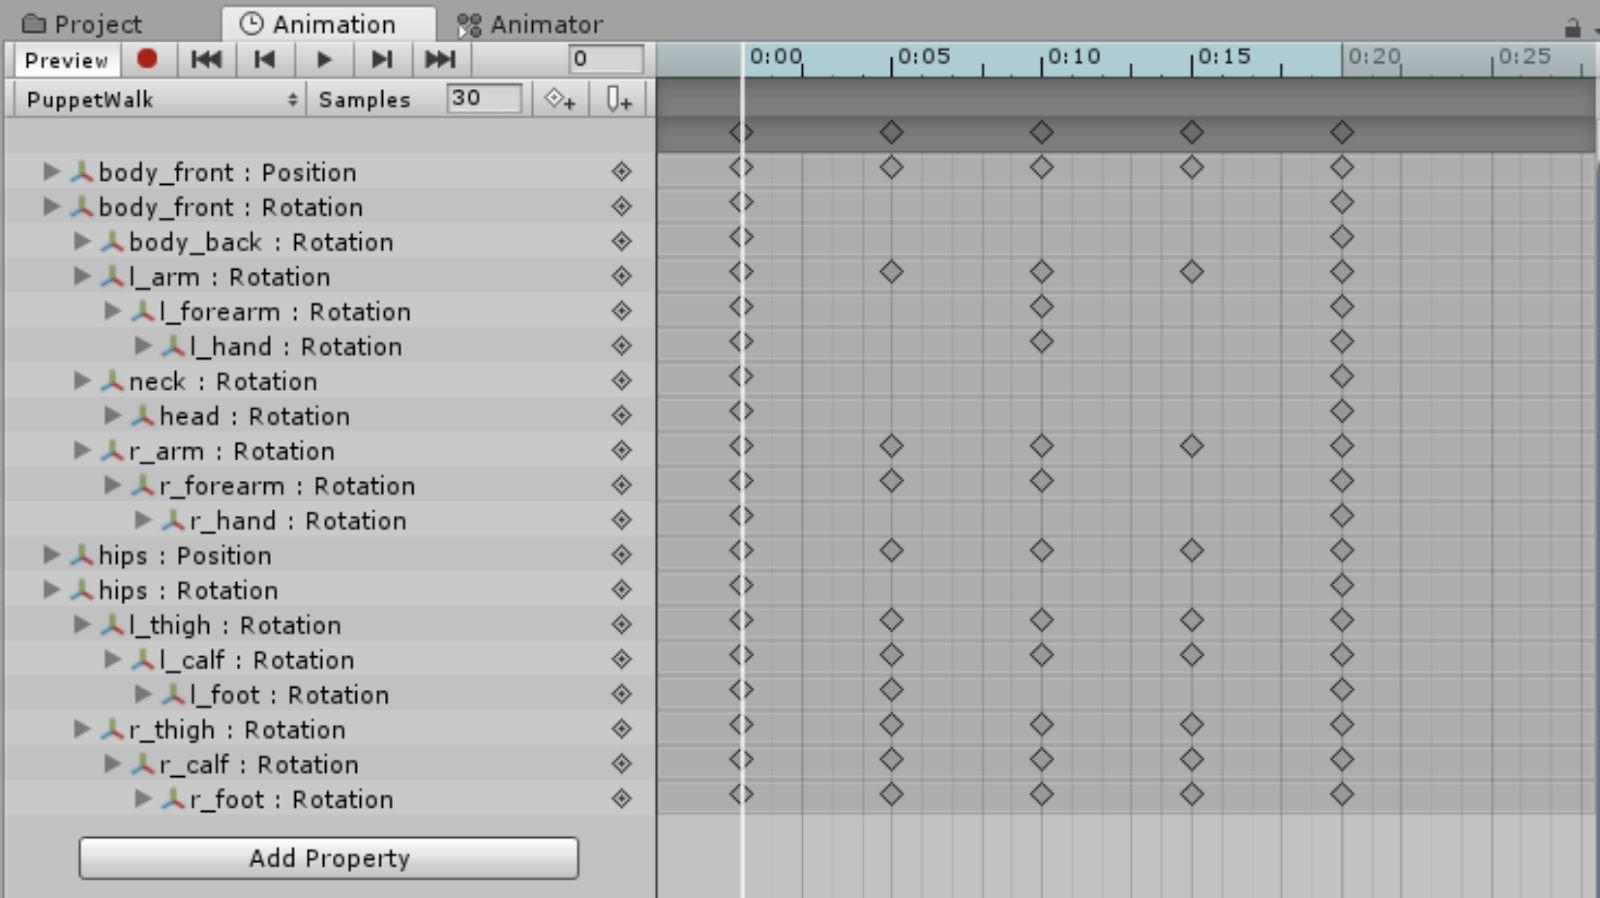
Click the Recording Mode (red circle) button in the Animation window. This will save all your object rotations and translations as frames of animation. Move the white animation line marker to the 0:05 mark. Then, use the rotation and translation tools to move each body part in the scene to make a walking keyframe. Go to the 0:10 mark and move everything to the next keyframe. Once you have made four keyframes, copy the first keyframe and paste it 0:05 after your last keyframe. (You can do this by clicking on the top gray diamond of the last keyframe so that all the diamonds turn blue, doing Ctrl+C, then moving the white animation line marker to the right time and doing Ctrl+V).
-
When you’re done, click the Recording Mode button again to exit recording mode. Notice that if you scrub through the top blue animation timeline, Unity interpolates your keyframes to create a smooth animation! At this point, your Animation window should look something like this:
-
Click the play button in the Animation window to see the animation. Feel free to adjust the Samples value and the frames’ spacing if the animation is too slow or fast.
Congrats, you’re done!
Supplementary Lecture
This supplementary lecture demonstrates how to improve your animations in the Animator using the 12 principles of animation.
Checkoff Requirement
Show your animation window and play your finished animation, which should be made with entirely original sprites.
Challenge
-
Try the other type of animation, if you didn’t do one of the types.
-
Add in-between frames for a smoother, more dynamic animation!
Bug Reports
If you experience any bugs or typos within the lab itself, please report it here!