Lab 8: Animator and Blend Trees
Table of contents
NOTE: Download the lab, unzip it, and open the project folder in Unity Hub!
Overview
The Animator is an element with an associated Component and Window (similar to Inspector, Project, Animation, etc.)
This window is where you connect your code to the visuals by defining the animation transitions.
Blend Trees are used inside of the Animator to organize and smooth the transition between similar Animations. Use cases of blend trees include transitioning between walk and run animations depending on how far you’re pushing your joystick or simply transitioning between up/down/left/right movement animations in a top-down 2D game (think retro Legend of Zelda).
In this lab, we will go through the process of implementing an Animator component for a player GameObject using predefined animations (either through the provided frames or through your own .anim files). Then we will communicate between the code handling the player movement and the animation transitions to finish implementing a simple 2D platformer player with idle, run and jump animation states. After that, we will implement a blend tree to transition between four different animation states for a top-down 2D game. By the end of this lab, you should be comfortable with creating and customizing Animator mappings, as well as recognizing how to simplify mappings using blend trees to support whatever your future games will require.
Setup
Open the Animator scene inside of the Scenes folder. Once upon, you’ll want to also pull up the Animator View. Go to the Window tab in the top bar and navigate to Animation > Animator. Once you have both the Animator scene and view pulled up, you’re ready to load in your animations. You have two options for this: either follow the next section to load in the sprites we provided, or provide your own animation frames / .anim files.
Load Your Animation Frames
- For each folder within
Animator/Animations/Frames, select all the images and click and drag them over the Player GameObject in theHierarchy View. - This will automatically create .anim files for each set of images you selected. Name them Idle_Anim, Jump_Anim and Run_Anim respectively.
- (Optional) Preview the animations to make sure they’re playing at the right speed. You can review the Lab 5: Animation for details on how to use the
Animation View. - You may have noticed in your project files that a new item called “Player” was created. This item is called an Animator Controller. You can also view this in the
Inspector Viewby clicking the Player GameObject in theHierarchy View. AnAnimatorcomponent was automatically added to the Player with a controller called “Player.” - Double click the Player Animator Controller to open it up in the
Animator View.
Load Your Own .anim Files into States
- If you have your own .anim files you want to use for this tutorial, add the
Animatorcomponent to the Player GameObject by selecting “Add Component” and typing in “Animator.” Then right click anywhere in yourProject Viewand navigate toCreate > Animator Controller. Name this controller “Player.” Click and drag this into theInspector Viewof the Player GameObject. - Double-click the Player Animator Controller in the
Project Viewto open theAnimator View. Alternatively, you can open the Animator by navigating toWindow > Animation > Animator. - Right click the empty space and select “New State.”
- Select this new state so that its properties appear in the
Inspector View. - Drag your .anim file from the
Project Viewinto theInspector Viewover the “Motion” field to load your animation. - Rename your new state(s) accordingly.
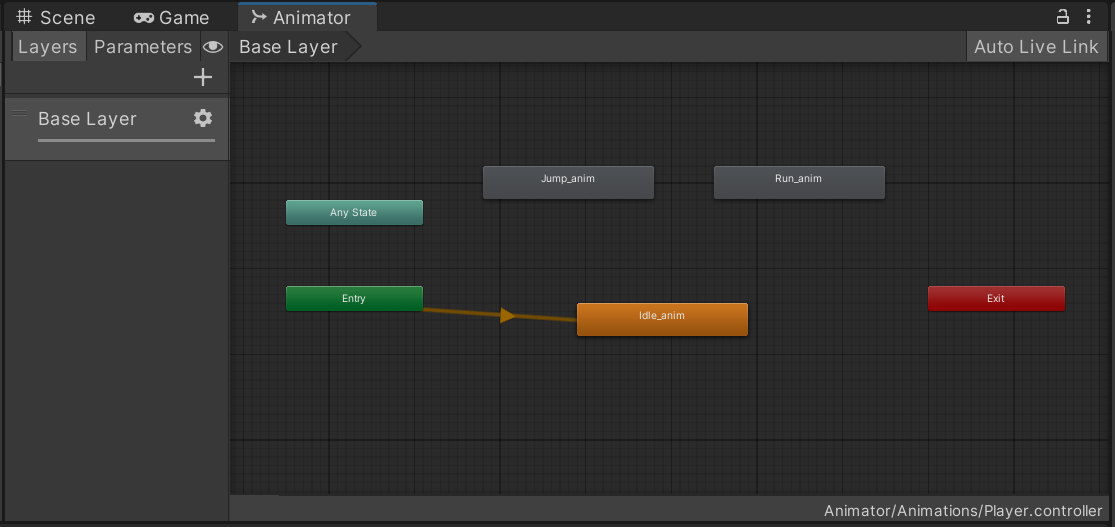
The Animator
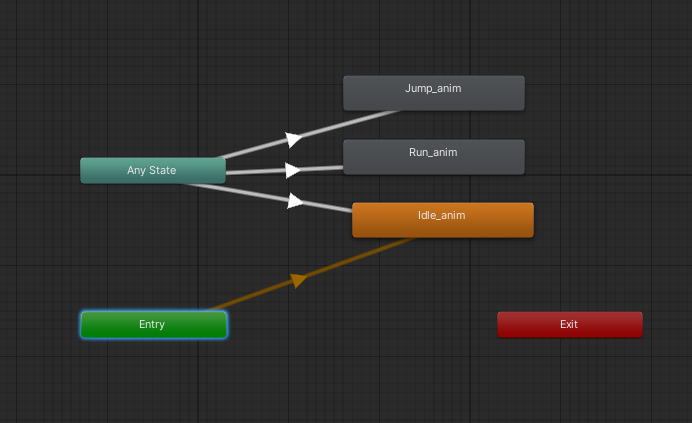
Your Animator should look something like this, with an Entry state, an Any State, three _anim states, and one Exit state.
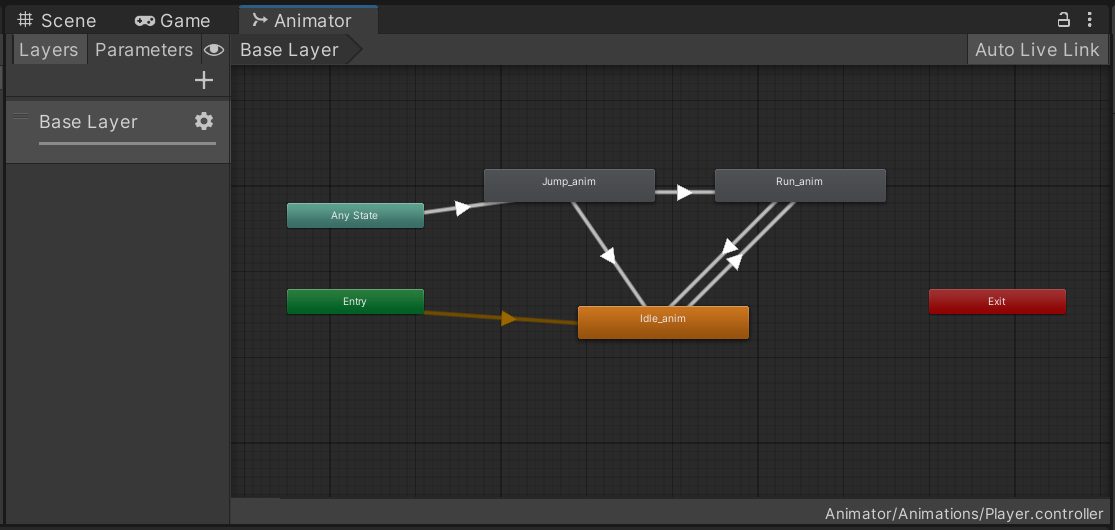
Transitions
Upon Entry, we will go directly to the Idle animation. Think for a moment about how you would want to be able to transition from one state to another, sketch out or visualize what that would look like in this mapping, then continue reading. From Idle, we want to be able to transition into Run, and from either Idle or Run we want to be able to transition into a Jump. After we finish Jumping, we want to be able to go back to either Idling or Running. To create a transition, right-click a state and select “Make Transition” and left-click the destination state.
In other words, create transitions according to the following Animator mapping:
How will we determine when to execute a transition? We need to define parameters that will only activate when our specified conditions are met.
At a high level:
- We will be idle if we are not moving.
- We will run when the magnitude of our velocity (our speed) is anything other than 0.
- We know we will jump when the jump button is pushed.
On the left half of the Animator View, observe the Parameters tab. Use the + button to the right of the search field to create a new float parameter called “Speed” and a new Trigger parameter called “Jump.” Note that the capitalization of these variable names do matter, so try to stay consistent in your naming conventions.
Now we will implement these parameters into the State Transitions we defined above.
Select the transition arrow from Idle -> Run. In the Inspector, click the + button under the Conditions tab and define it to react only when Speed is greater than 0.5. We just need a small number; technically, a number like 0.00001 would suffice, but 0.5 just looks cleaner and functions the same for the purposes of this tutorial so we’ll stick with that.
Now make the following changes:
- Select the transition from Run -> Idle and set it to activate only when Speed is less than 0.5
- Select the transition from Jump -> Idle and set it to activate only when Speed is less than 0.5
- Select the transition from Any State -> Jump and set it to activate only when the Jump Trigger is activated.
You may be wondering why we can’t use the Any State to transition to Idle and Run the same way we did for Jump. It’s not that you can’t, there are many ways to implement an Animator, this is just one of them. For example, you could use a isMoving boolean to check if the player is moving, or have an isJumping boolean to check whether a foot collider is touching the ground. You can explore, expand, or redesign this implementation as part of the extra challenges part of this lab.
Connecting to Scripts
With our Animator logic all set up, everything makes sense in theory but none of it has truly been implemented yet. To do this, we’ll have to communicate our movement to the Animator Component through our movement script.
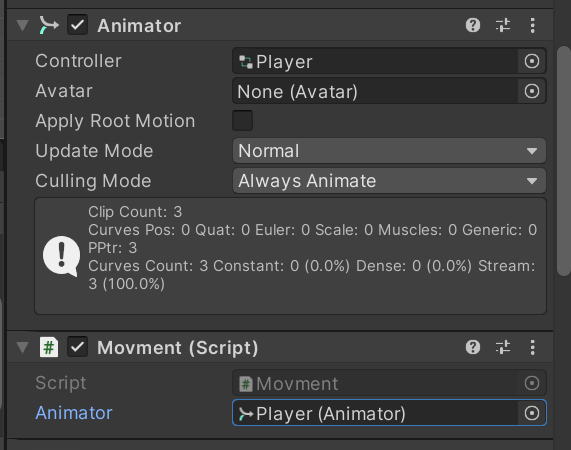
Create a Movement.cs script and attach it to the Player GameObject. In order to communicate with the Animator, we’ll need to create a reference to it in our script.
You can either (1) create a private reference and use GetComponent to retrieve the Animator or (2) create a public reference and drag/drop the Animator in from the Inspector View.
-
private Animator animator; ... void start() { animator = GetComponent<Animator>(); ... -
public Animator animator;
Inside the script, create the Update() function. Inside Update(), check for inputs corresponding to whichever keys you’ve assigned to be left, right, and jump using either Input.GetKey() or Input.GetButton. For jump, use GetKeyDown or GetButtonDown, as this will only trigger once when you push it, and will not continue to fire if you hold it.
Using our reference to the animator, you can use the various .SetFloat/.SetBoolean/.SetTrigger methods to change the parameters inside the Animator. In our case, you’ll make the following calls at least one time:
- animator.SetFloat(“Speed”, 1);
- animator.SetFloat(“Speed”, 0);
- animator.SetTrigger(“Jump”);
Remember that because of the way we implemented our Speed check, you’ll have to manually reset the speed to 0 whenever you do not detect a left/right input. Try implementing the script yourself before moving on to the staff solution.
Movement.cs
Since this isn’t really a scripting lab, the code for this script is below. Feel free to copy and paste the whole thing, but you will be required to understand how to modify the Animator parameters via code in order to check off:
    using System.Collections;
    using System.Collections.Generic;
    using UnityEngine;

    public class Movement : MonoBehaviour
    {

        private Animator animator;
        private Rigidbody2D rb;
        private SpriteRenderer sr;

        // Start is called before the first frame update
        void Start()
        {
            animator = GetComponent<Animator>();
            sr = GetComponent<SpriteRenderer>();
            rb = GetComponent<Rigidbody2D>();

        }

        // Update is called once per frame
        void Update()
        {
            if (Input.GetKeyDown(KeyCode.UpArrow))
            {
                animator.SetTrigger("Jump");
                rb.AddForce(new Vector2(0, 5), ForceMode2D.Impulse);
            }
            if (Input.GetKey(KeyCode.RightArrow))
            {
                animator.SetFloat("Speed", 1);
                transform.position = (Vector2)transform.position + new Vector2(5, 0) * Time.deltaTime;
                sr.flipX = false;
            }
            else if (Input.GetKey(KeyCode.LeftArrow))
            {
                animator.SetFloat("Speed", 1);
                transform.position = (Vector2)transform.position + new Vector2(-5, 0) * Time.deltaTime;
                sr.flipX = true;
            } else
            {
                animator.SetFloat("Speed", 0);
            }
        }
    }
Testing
Ensure that the Game View and Animator View are open side-by-side and not in the same Window. This will let you view the animator at work during live play and modify the parameters directly.
Hit the Play button and notice that you can view the current animation playing inside of the Animator View denoted by the little progress bar in the active state looping.
Test our Jump logic by clicking the little bubble next to Jump in the Parameters list. If all goes as planned, you should play through most of your Jump animation. The trigger acts as a one-time button rather than a Boolean switch; it flips on for a single frame and then automatically switches off.
Change your speed variable to be greater than 0.5 then change it back to 0 to view the transition. This is useful for testing your logic.
One issue here is that the Jump animation looks like it’s been cut short. This is due to the transition time from one animation to another.
Exit playmode and select the Any State -> Jump transition. Disable “Has Exit Time” and set Transition Duration to 0. This will make the transition from Idle/Run to Jump instantaneous with no smoothing. For player actions that require quick visual feedback like jumping, attacking or dashing, you should consider reducing or removing exit and transition time.
For specific cases such as moving from the idle into the running state, you may want to leave the transition to make it feel smoother. This is all up to your preference.
Tweaking Animation Speeds
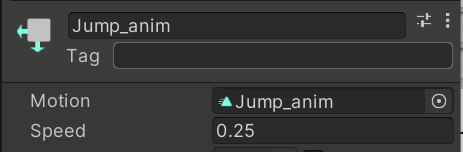
Press the Play button and try jumping. Notice how the jump animation is too quick. We can fix this by selecting the jump animation state and slowing the speed down. Tweak it around to see what feels right for you and feel free to change the jump strength in the script. I found a speed of 0.25 to work well with this implementation. Don’t be afraid of going into the Animation View and modifying the length of the animation itself instead of just changing the overall playback speed!
Animator Checkoff
Explain the process of implementing transitions in the Animator and setting parameters in code.
Animator Challenge (Optional)
Remove the ability to infinite jump while in the air (i.e. you can only jump if you’re on the ground) Make whatever changes necessary to make this Animator map function the same way as our current implementation:
Blend Trees
The animation frames are already set up for the player’s four directions (up, down, left, right). In this lab, we will set up and test a Blend Tree. If you want to learn how to set up these animations, please visit the Appendix.
- Open the
Blend Treesscene through theScenesfolder. - Inside the
Blend Treesfolder, open the Animation Controller called “player_Animation”. - In the
Animator View, we can see that for now, the player is only connected up to an idle animation. - We want to set it up so that a different walk animation plays when the player changes direction so that the player faces the direction it’s moving in.
-
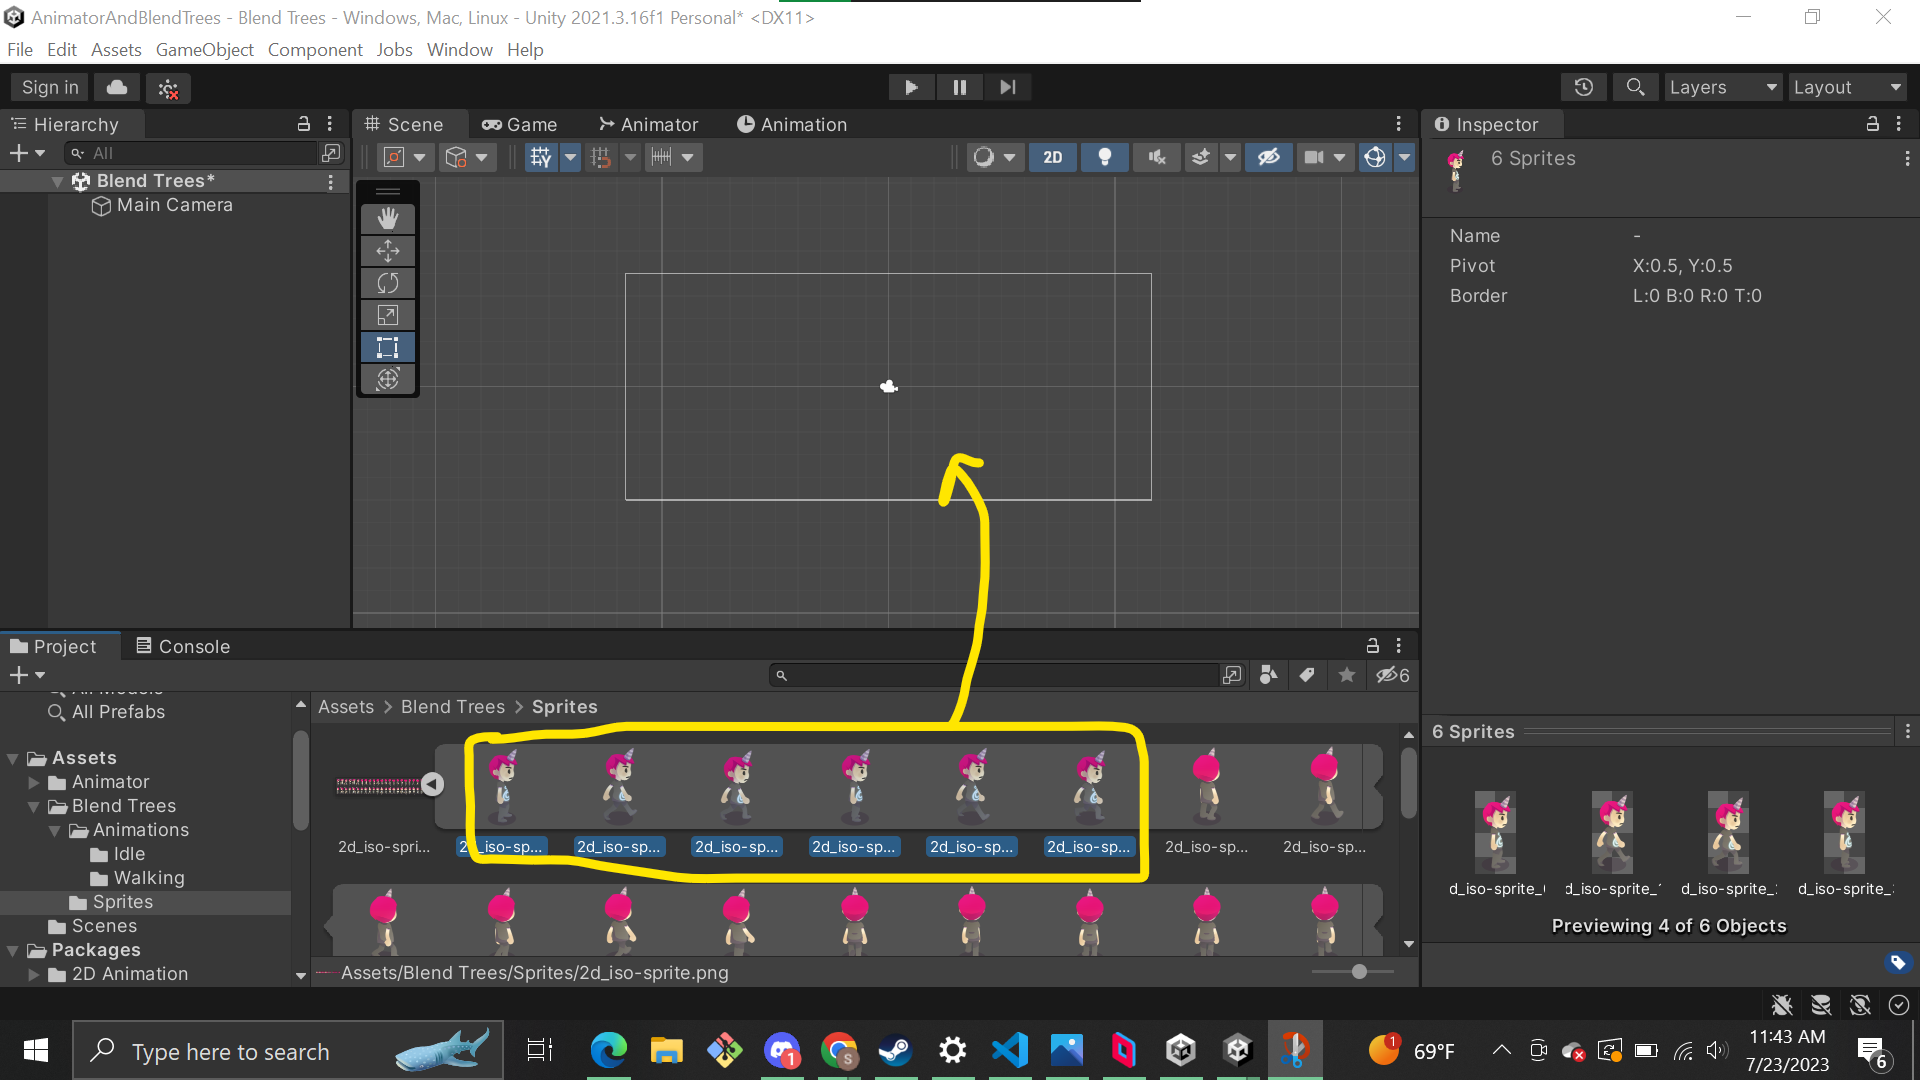
To check how our animations are set up, you can find them in the
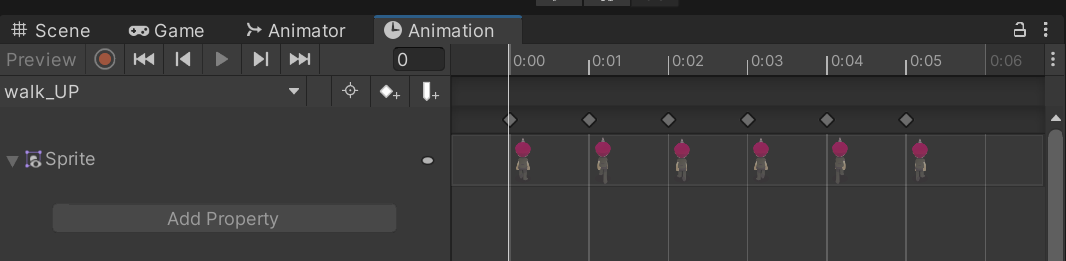
Blend Trees/Animation/Walkingfolder. If you open them, they should have a couple keyframes that show up in theAnimation View. If you click on Sprite, the frames should show up.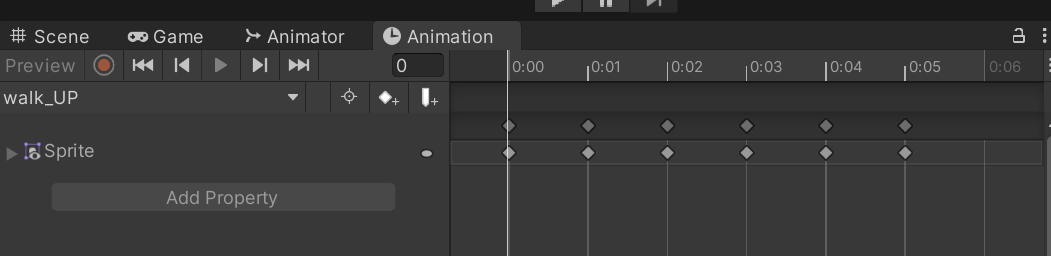
- Go back to the player_Animation object and in the
Animator View, right click the background, then clickCreate State > From New Blend Treeto create a new blend tree node. Name this blend tree “Walking”. - Double click the blend tree you just created to open it and click on the node that appears. In the
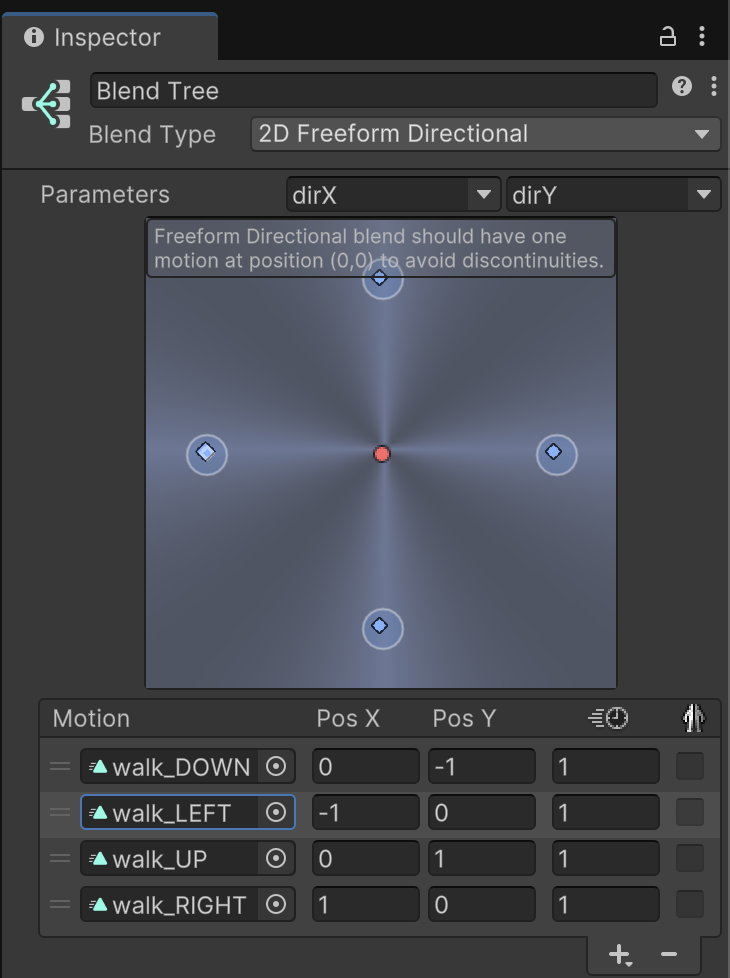
Inspector View, select “2D Freeform Directional” from the Blend Type drop-down menu and make sure the parameters that appear are “dirX” and “dirY”. These have been configured in the player movement script to correspond to the relative direction of the player’s mouse from the character’s location. The blend tree will check these values to decide which walking animation to play. Now click the plus button and select Add Motion Field. - Click the circle next to None (Motion) and select “walk_DOWN” from the list that appears. Update the “Pos X” field with 0, and the “Pos Y” field with -1. This is because the coordinates correspond to (0, -1). The third field is the animation speed; leave it as it is.
-
Add three more fields for each of the rest of the walking animations. walk_RIGHT corresponds to (1, 0), walk_UP corresponds to (0, 1), and so on. In the end, your blend tree should look something like this (note: the animation names are different in the picture than in your lab).
- Finally, all that’s left to do is to create transitions between the Idle animation and the Walking blend tree. Return to the Base Layer and right click on the Walking blend tree node, then select Make Transition. Connect it to the Idle animation so that there’s a transition from Walking -> Idle.
- Click on the white arrow that appears between Walking and Idle. Press the plus button under “Conditions” and select “walking” from the drop-down menu, with a value of false. If “walking” does not show up, create the parameter as a boolean in the Animator sidebar. Uncheck the “Has Exit Time” box as well as the “Fixed Duration” box.
- Create a second transition, this time from Idle to Walking, and set “walking” to true.
-
Make sure the Idle animation is set to the default state. If not, you can do this by right clicking the Idle animation and selecting Set as Layer Default State. When you’re done, it should look like this:

- Press play and move the character around by right clicking on the screen. Notice how now, a different animation is played when the player moves in a different direction!
Blend Trees Checkoff
Move your character around the screen in play mode to show the blend tree changing.
Blend Trees Challenge (Optional)
If you find the sprite file in Assets/Blend Trees/Sprites, you’ll see the sprite has more animation frames than we’re using in the lab above: Up-Left, Up-Right, Down-Left, Down-Right. Set up the Walking Blend Tree to use the other four directions! Note: You’ll have to create the Animations with those sprite frames first.
Appendix
Setting up Animations for Blend Trees
- Go to
Assets/Blend Trees/Spritesto find the sprite image file. It should have multiple sprite images in one file. - Click the little triangle to the right of the file.
- Select the images you want as frames in your animation.
- Drag and drop them into your
Scene View. - This will pop up a window asking you to save this sequence as an animation.
- Once you save, you should have a Unity animation object with the sequence of images!
The process might create new animation controllers for each animation sequence you drag drop into Scene. You can delete those without affecting the animation object.
Bug Reports
If you experience any bugs or typos within the lab itself, please report it here!