Project 1 2D
Table of contents
- Section 1: Creating the Player
- Section 2: Creating the Enemies
- Section 3: Health and Damage
- Section 4: Health UI
- Section 5: Sound and Camera
- Section 6: Pickups
- Section 7: Menu Screens
- Bug Reports
Section 1: Creating the Player

In this section, we will be kicking off our game development journey by creating the player and implementing their basic actions. By the end of this section your player will be able to:
- Move in four directions
- Attack in four directions
Links to the “solution” on YouTube are spread throughout the entire write up. You will need to translate the hex code below to ASCII in order to get the link with the correct timestamp. This will be the case for all YouTube links.
An important part of debugging in Unity is using
Debug.Log(), or print statements to figure out the output of your code, if objects are properly assigned to variables, and generally to gain some sort of insight on what your code is doing. Use these to your advantage if you get stuck debugging, such as figuring out where NullReferenceExceptions are coming from!
Player Movement
Summary:
- Create the player object, and add the player movement script
- Be able to move the player object in any direction.
Open up the SampleScene scene located in assets/scenes. You should see a grassy 2D map in your scene view.
Look in the hierarchy and select the Player object. In the Sprite Renderer component, change the Sprite from None to idle_east_1.
Add a new component titled Rigidbody 2D and a Capsule Collider 2D. Make sure that the Body Type for the Rigidbody component is Dynamic and Gravity Scale is 0. Under constraints, Check the Freeze Rotation box as well.
In the Capsule Collider, we want to set the hitbox of the sprite to be the same size as the sprite. In order to add some depth, we will set the hitbox as the feet of the sprite. You may use the numbers in the image below, and to check if your Rigidbody is also correct.
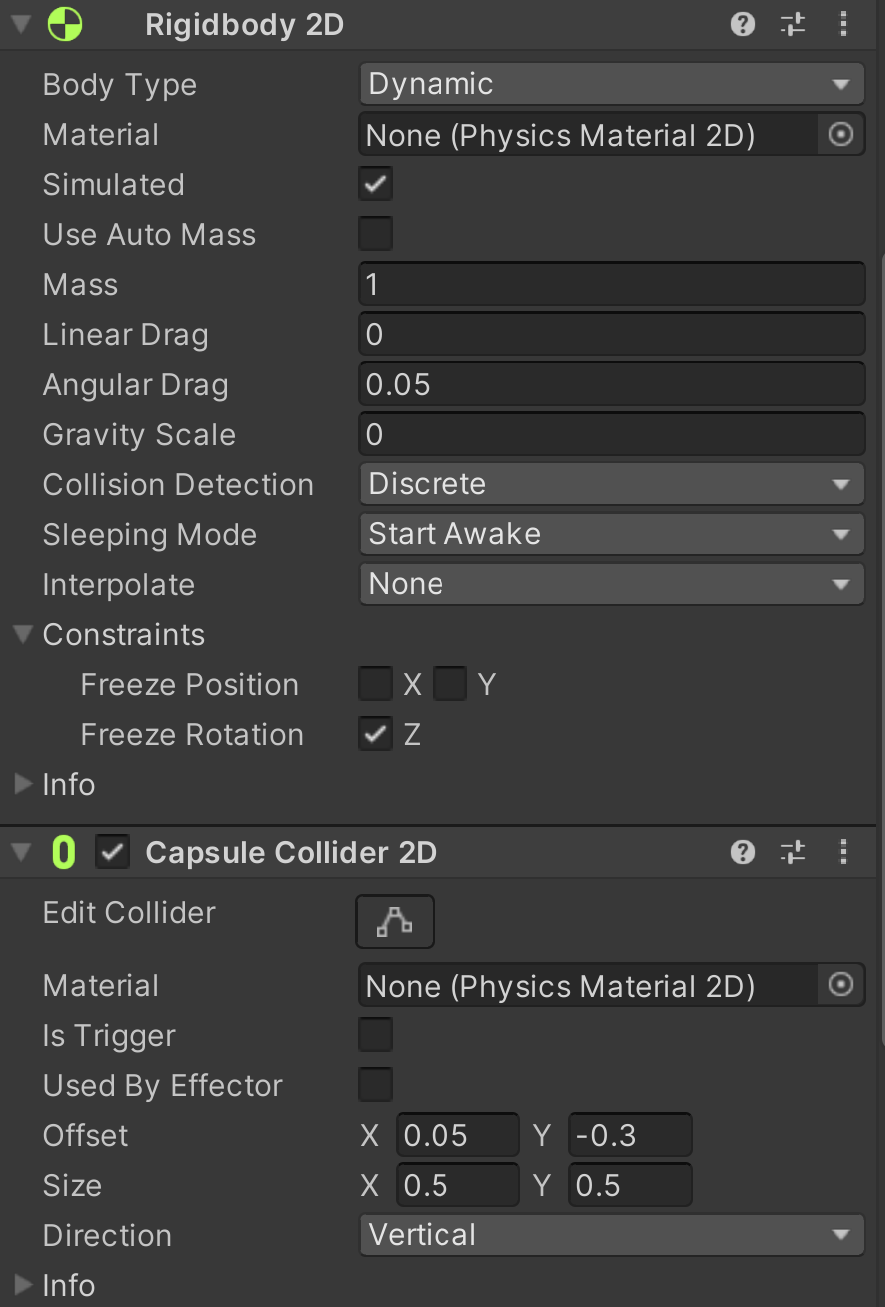 Fig 1.1
You should see the Player.cs script already attached to the Player. Double click it, and open up the script.
There are two ways to open the script. You can either double click on it via the project directory or through the inspector by clicking on the three dots > edit script.
In order to keep our code clean, we will use #region boundaries to sort and organize our variables. You can see it in the given code here.
#region Movement_variables
public float movespeed;
float x_input;
float y_input;
#endregion

#region Physics_components
Rigidbody2D PlayerRB;
#endregion

#region Unity_functions
private void Awake()
{

}

private void Update()
{

}
#endregion
movespeedwill control how fast the player can move. Note that it is public, such that we can edit it in the inspector in real time to try different speeds.x_inputandy_inputwill be used to determine where the player should be going based on the user input.PlayerRbwill control the forces we add onto the player.Awake()is called ONCE when the object is created, and never again.Update()is called EVERY frame. This means that we do not want any intensive or heavy code in Update as that would be costly, and could lag, or even crash your game.
Here, we will leave you with a small coding exercise. If you can’t do it off the top of your head, no worries! You can follow the project video linked with the timestamp.
Task 1.1:
- In
Update(), you will need to do two things.- Access the user input values (button presses that correspond to the movement in the game) and map them in
Update().- This will require you access the Input Manager which is located in
Edit -> Project Settings -> Input Manager->Axesto determine which buttons the project assumes as the positive and negative button for horizontal and vertical movement. For our case, we will use WASD. - Use the function
Input.GetAxisRaw()to get the raw input for the horizontal and vertical movement (which should be a value from -1 to 1), and set them tox_inputandy_inputrespectively. HINT:Input.GetAxisRaw()takes in a singular string as its argument. Link to documentation: https://docs.unity3d.com/ScriptReference/Input.GetAxisRaw.html
- This will require you access the Input Manager which is located in
- Call the Move() function after you’ve stored the user input values.
- Access the user input values (button presses that correspond to the movement in the game) and map them in
- Now, Implement the Move() function inside the
Movement_functionsregion which will move the player based on thex_inputandy_input.- You will need 5 cases to determine what the player should do.
- Set
PlayerRB.velocitytoVector2.up/down/left/right/zerobased on which case you are on. - The player’s velocity should be scaled by
moveSpeed
Functions to modify:
PlayerController.cs -> Update() and Move()
Below is the hex code for the solution.
68 74 74 70 73 3A 2F 2F 79 6F 75 74 75 2E 62 65 2F 64 73 4D 6B 44 6E 75 43 64 2D 41 3F 6C 69 73 74 3D 50 4C 6B 54 71 66 35 44 42 7A 50 73 41 65 2D 70 52 35 62 44 55 64 77 48 69 43 4E 67 48 63 79 42 49 68 26 74 3D 33 36 35
To check if we have coded this correctly, put in some value for moveSpeed (staff solution uses a value of 2f) and see if the player moves with the WASD keys.
If you are having trouble viewing your player, you might have to adjust the z axis of the Main Camera object. First, uncheck the CinemachineBrain component, and set the Z position to be -3.
You may notice that some keys override the keys of others (when pushing both down and left, your character may only go left), as a design choice, we do not support diagonal movement. Feel free to improve / change this function from the tutorial code as you see fit.
Player Attacks
Summary:
- Be able to attack when pressing the “J” key in all four directions
- Cast the hitbox in the right direction
- Add animations
Find these regions in your PlayerController script, which will define some new variables for you.
#region Attack_variables
public float Damage;
float attackSpeed = 1;
float attackTimer;
public float hitBoxTiming;
public float endAnimationTiming;
bool isAttacking;
Vector2 currDirection;
#endregion

#region Attack_functions
private void Attack()
{
    Debug.Log("attacking now");
}

IEnumerator AttackRoutine()
{
    yield return null;
}

#endregion
Damageis how much damage you do each hit.attackSpeedis how long you need to wait before you have to attack again.attackTimerwill work withattackSpeedby timing when the player last hit. On attacking, it will reset, and count down once more.hitBoxTimingandendAnimationTimingwill allow us to have a delay from when the animation starts, to when we actually hit the enemy. This will make the animation feel more convincing by having it hit when the sword is being swung, rather than when it is winding up.isAttackingwill let us know if the user has inputted an attack, which will then pause our movement.currDirectionwill make sure that if we attack right, we attack right, rather than to a different direction.Attack()is the function that will be called when the player attacks.AttackRoutine()will handle animations and hitboxes for the attack mechanisms.
You may notice that the data type of the
AttackRoutine()function is an IEnumerator rather than a public or private function. This is an example of a coroutine which you will learn about in a later lab. If you have taken 61A, it is similar to yield functions and generators.
Task 1.2: Choose an Attack key, and in Update(), call the private Attack() function when your chosen attack key is pressed down. You will need to use Input.GetKeyDown(KeyCode key) function to determine if your chosen key is being pressed. The staff solution uses the J key as the attack key
Functions to modify:
PlayerController.cs -> Update()
Below is the hex code for the solution.
68 74 74 70 73 3A 2F 2F 79 6F 75 74 75 2E 62 65 2F 64 73 4D 6B 44 6E 75 43 64 2D 41 3F 6C 69 73 74 3D 50 4C 6B 54 71 66 35 44 42 7A 50 73 41 65 2D 70 52 35 62 44 55 64 77 48 69 43 4E 67 48 63 79 42 49 68 26 74 3D 31 31 34 39
If you save, press play, and press your attack key, you should see in the bottom left a print statement saying attacking now. This is your console, and will be very helpful in debugging, and testing code in labs, and projects. It will also display any warnings, and errors that you may have.
For now we just want to check if the attack key is working; you will implement the attacking logic in a later section.
We will now make it such that you cannot spam the ability as fast as you can using the attackSpeed and attackTimer variables.
Re-read the definitions for
attackSpeedandattackTimerabove to understand how you can utilize these two variables to implement an attack cooldown.
Initialize the attackTimer variable in Awake() to 0, as that will indicate that we can attack again.
Task 1.3: In Update(), modify your attacking conditional statement to only call Attack() when attackTimer < 0. If not, we don’t want to attack, and subtract Time.deltaTime, but if we do attack, we want to call the Attack() function AND set attackTimer to attackSpeed` to reset the cooldown.
Functions to modify:
PlayerController.cs -> Update()
PlayerController.cs -> Attack()
You can complete this task by only modifying
Update()but the code will be more clean if you seperate your logic between the two functionsUpdate()andAttack()
Below is the hex code for the solution.
68 74 74 70 73 3A 2F 2F 79 6F 75 74 75 2E 62 65 2F 64 73 4D 6B 44 6E 75 43 64 2D 41 3F 6C 69 73 74 3D 50 4C 6B 54 71 66 35 44 42 7A 50 73 41 65 2D 70 52 35 62 44 55 64 77 48 69 43 4E 67 48 63 79 42 49 68 26 74 3D 31 33 34 30
Back in the Unity editor, if you select the Player object, there will be an input field for AttackSpeed, set it to 3, save, and play the game to see if the cooldown is working.
Notice when we walk in different directions, the player sprite doesn’t switch the way it is facing, and it can only attack in one direction.
Task 1.4: Inside of the Move() function, set currDirection to the new direction you’re moving towards. For instance, if we are moving to the left, we would set currDirection = Vector2.left; currDirection will be used to orient the player sprite when performing basic actions.
You only need to worry about setting currDirection, the function
AttackRoutine()and the starter code forMove()will usecurrDirectionto set the correct Player sprite when walking and attacking, that is already taken care of for you. If you would like to set the details of the implementation look insideAttackRoutine()andMove()or look through the video which implements it from scratch. *Note: the attack animation won’t work until we correctly implementAttackRoutine()”
Functions to modify:
PlayerController.cs -> Move()
Below is the hex code for the solution.
68 74 74 70 73 3A 2F 2F 77 77 77 2E 79 6F 75 74 75 62 65 2E 63 6F 6D 2F 77 61 74 63 68 3F 76 3D 64 73 4D 6B 44 6E 75 43 64 2D 41 26 6C 69 73 74 3D 50 4C 6B 54 71 66 35 44 42 7A 50 73 41 65 2D 70 52 35 62 44 55 64 77 48 69 43 4E 67 48 63 79 42 49 68 26 74 3D 31 33 34 30 73
You can now check to make sure that it works by adding another Debug statement in Attack() to check the current direction with Debug.Log(currDirection); which will print out two values to display the current direction.
Finally, in the inspector, change the AttackSpeed to 0.5, since we don’t only want to be able to attack every 3 seconds.
Now, we will start on being able to cast the hitbox in the right direction, which is already done for you in the coroutine, or the IEnumerator function titled AttackRoutine(). You only need to modify the Attack() function by calling AttackRoutine() using the function StartCoroutine().
StartCoroutine()takes in a coroutine/IEnumerator as its only argument. https://docs.unity3d.com/ScriptReference/MonoBehaviour.StartCoroutine.html
Here is a breakdown of the AttackRoutine() function:
IEnumerator AttackRoutine()
{
    isAttacking = true;
    PlayerRB.velocity = Vector2.zero;
    yield return new WaitForSeconds(hitBoxTiming);
    Debug.Log("Casting hitbox now");
    RaycastHit2D[] hits = Physics2D.BoxCastAll(PlayerRB.position + currDirection, Vector2.one, 0f, Vector2.zero);

    foreach(Hit2D hit in hits)
    {
        if(hit.transform.CompareTag("Enemy"))
        {
            Debug.Log("Tons of damage");
        }
    }

    yield return new WaitForSeconds(hitBoxTiming);
    isAttacking = false;
}
- We set
isAttackingto true, and set the player’s velocity to 0, as, a design choice, the player will not be able to move when they attack. yield return new WaitForSeconds(hitBoxTiming);will basically pause the running of the function forhitBoxTimingnumber of seconds before running the next line.hitsis an array of all the objects that are colliding with a box that is in front of the player. To learn more aboutBoxCastAll, you can check out the function description here. We highly suggest you read through the documentation and understand what each input is. The video also describes each variable at the timestamp given below.- We will then iterate through each hit that we found from our , and if it has the tag of “Enemy”, will print the statement “Tons of damage”.
- We will then wait
hitBoxTimingseconds, and then setisAttackingback to false.
A video breakdown of this function is avaliable here:
68 74 74 70 73 3A 2F 2F 79 6F 75 74 75 2E 62 65 2F 64 73 4D 6B 44 6E 75 43 64 2D 41 3F 6C 69 73 74 3D 50 4C 6B 54 71 66 35 44 42 7A 50 73 41 65 2D 70 52 35 62 44 55 64 77 48 69 43 4E 67 48 63 79 42 49 68 26 74 3D 31 37 37 39
Go back into Unity, and set the Player object to have the Player tag. This will be right under the Object name.
Tags are labels we can assign to every game object, and is useful in selecting specific types of objects.
Now, add an if statement at the very beginning of Update() to check if isAttacking is true. If so, then just return.
Save your script, and go back into the inspector for the Player object. Set the following variables to these values:
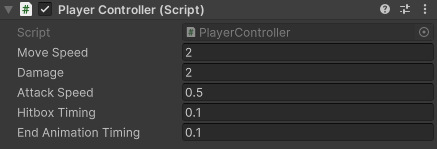 Fig 1.2
Movespeedto 2Damageto 2AttackSpeedto 0.5hitBoxTimingandendAnimationTimingto 0.1
Except for hitBoxTiming and endAnimationTiming, feel free to adjust the other variables to whatever values you desire; these are just values for the staff solution.
Make sure you are constantly saving your project using either
Ctrl+SorFile > Savewhenever you make changes to it. Unity can crash at any time, so saving frequently can reduce the damage done to your progress when these unlikely scenarios may occur.
If you press Play, you will now see that if you attack, the player will pause for a brief moment before resuming movement.
 Fig 1.3
Congrationlations on finishing this long and tedious section! Feel free to take a tea break before moving onto the next section (:
You should also see the
animvariable sprinkled around in the code. This will take care of the animation side of the player, which we have already provided for you.
Section 2: Creating the Enemies
In the arena of challenges, foes emerge as catalysts for resilience and architects of growth. Embrace the dance with adversaries, for it is through the crucible of opposition that the strength of character is forged.
In this section, we’ll be designing a enemy for the player to fight. The enemy will have a circular line of sight that, when the player enters, triggers the enemy to chase the player and explode upon contact; dealing damage to the player. The player will also be able to deal damage back to the enemy.
Summary:
- Create an enemy that tracks and chases the player
- When the enemy makes contact with the player, it explodes and deals damage to the player
- Implement the ghost walking animation for the enemy
Enemy Setup
First, create an empty GameObject by right clicking in the hierarchy and name it Enemy. Attach a SpriteRenderer, Rigidbody2D, and a CircleCollider2D.
In the SpriteRenderer component, change the Sprite from None to Enemy 1.
If you can’t see the Enemy GameObject, this is because it is hidden behind the Grassy Map layer. To fix this, still inside SpriteRenderer, change the Sorting Layer from Default to Enemy
Look at the RigidBody2D component:
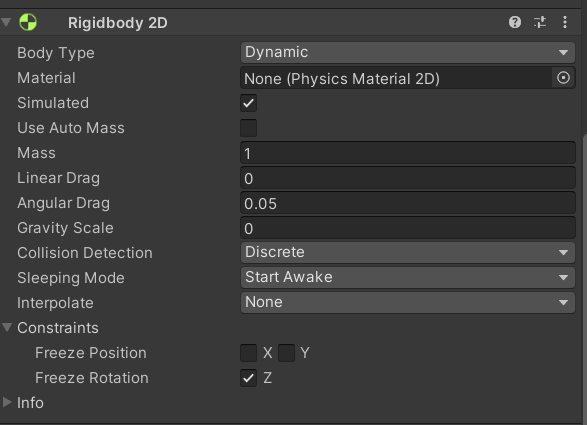 Fig 2.1
- Set the gravity scale to zero (fig 2.1)
- Check the box next to rotation to freeze the z rotation (fig 2.1)
For the Circle Collider 2D, you can leave everything default
Finally, attach the Enemy.cs script to the enemy GameObject and set it’s tag to Enemy.
Now, we have a basic enemy GameObject.
Setting Up Enemy Line of Sight
An enemy should attack the player if the player is within a certain radius.
To get started on a detection system, make a empty GameObject named LineOfSight; this object should be a child of the Enemy GameObject. In order to parent them, in your hierarchy, select and drag the child object (LineOfSight) over the parent object (Enemy), if you let go of the mouse button and drop the object ontop of Enemy, LineOfSight should get indented and is now a child of the Enemy GameObject.
Now, look at the inspector column and click the three dots at the top-right of the Transform component, select Reset. This ensures the LineOfSight GameObject is at the center of the Enemy GameObject.
Attach a CircleCollider2D to your newly created LineOfSight GameObject. When the player enters this circle collider, it will notify the enemy to move and attack the player. You must make two changes:
- Check the IsTrigger box. This way your circle collider won’t bump into other objects
- Adjust the radius of the collider to your desired range (staff solution uses a radius of 4)
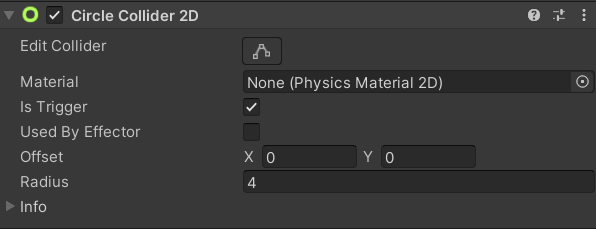 Fig 2.2
Lastly, attach your LineOfSight.cs script to your LineOfSight GameObject.
The Enemy Script
Now, let’s make the enemy chase the player. Open up the Enemy.cs script located under the scripts folder. Below are the variables you’ll need to complete this task:
#region Movement_variables
public float moveSpeed
#endregion

#region Physics_components
private Rigidbody2D rb;
#endregion

#region Targeting_variables
public Transform player
#endregion
-
moveSpeedwill let us control the movement speed of the enemy. It is public so that we can adjust the enemy’s speed in the unity inspector. -
EnemyRBwill hold a reference to the enemy’s Rigidbody2D. This way, we can manipulate the rigidbody’s velocity property to create movement. -
playerwill hold a reference to the player’s transform component. This way, we can have a easy reference to the player’s position for the enemy to move towards. This can be either public or protected (protected means scripts of children game objects have access) because we will need to set this variable inside the player script.
Task 2.1: Using the three variables above, implement the logic for the enemy’s movement system: **if and only if the player triggers the LineOfSight collider, PlayerController.cs’s player variable to the Transform of the player GameObject, then move the enemy towards the player’s transform position. You will need to edit the OnTriggerEnter2D() function in the LineOfSight.cs script, in addition to the Move() and Update() functions in the Enemy.cs script.**
Functions to modify:
LineOfSight.cs -> OnTriggerEnter2D()
Enemy.cs -> Move() and Update()
The variable
Playerwill hold a reference to the player’s Transform when it is is within line of sight. Otherwise, it will return null. How can you utilize this logic to check if the player is within the line of sight?
Below is the hex code for the solution.
68 74 74 70 73 3A 2F 2F 79 6F 75 74 75 2E 62 65 2F 49 39 4A 47 39 6B 55 31 37 52 49 3F 73 69 3D 4B 4A 52 68 50 6E 78 72 36 54 45 48 51 71 59 69 26 74 3D 35 39 31
Once implemented, if the player enters the enemy’s line of sight, the enemy should chase the player down. However, if you stop moving, the enemy will slowly push you off the screen. We’ll address this in the next part.
Dealing Damage to the Player
Once the enemy makes contact with the player, it should explode and deal damage to the player. Let’s implement the logic for it.
#region Attack_variables
public float explosionDamage;
public float explosionRadius;
public GameObject explosionObj;
#endregion
explosionDamageis how much damage will be dealt to the player when hit with the explosion of the enemy. It is public so we can easily adjust the damage in the Unity Inspector.explosionRadiuslets us control the enemy’s explosion size. It is public so we can adjust the radius in the Unity InspectorexplosionObjwill hold a Prefab that plays the explosion animation when instantiated.
Inside the same Enemy script, there is a Explode() function you need to implement. The function will be invoked when the player and enemy make contact. Upon contact, spawn the explosionObj in place of the enemy and Debug.Log("Tons of damage") if it catches player in the explosionRadius (you will implement the damage in a later section). Finally, destroy the enemy GameObject. After implementing Explode(), call Explode() in OnCollisionEnter2D() if the player collides with the enemy.
Task 2.2: Implement Explode() and invoke Explode() in OnCollisionEnter2D() if the player collides with the enemy.
Functions to modify:
Enemy.cs -> Explode() and OnCollisionEnter2D()
Use a 2D circle raycast (https://docs.unity3d.com/ScriptReference/Physics2D.CircleCastAll.html) to detect if the player is within the
explosionRadius. For the direction parameter, you can just pass inVector2.zero.CircleCastAll()returns an array of all objects caught in the circle cast. They will be of typeRaycastHit2Dwhich hold the same basic properties as game objects such as theTransformandtagproperty. You can reference theAttackRoutine()back in section 1 of making the player. Checkout theInstantiate()documentation (https://docs.unity3d.com/ScriptReference/Object.Instantiate.html) as it will prove useful when spawning the explosion animation.
Also make sure to set your attack variables in the Unity inspector before testing your code! We provide a explosion prefab located in Assets > Prefabs that you can drag into explosionObj in the unity inspector.
Below is the hex code for the solution.
68 74 74 70 73 3A 2F 2F 79 6F 75 74 75 2E 62 65 2F 49 39 4A 47 39 6B 55 31 37 52 49 3F 73 69 3D 30 37 55 51 48 35 7A 41 52 65 6A 6E 69 6B 30 58 26 74 3D 31 32 30 37
To test your implementation, walk into the enemy’s line of sight and let it collide with you. The enemy should die and spawn a explosion upon contact. BOOM!
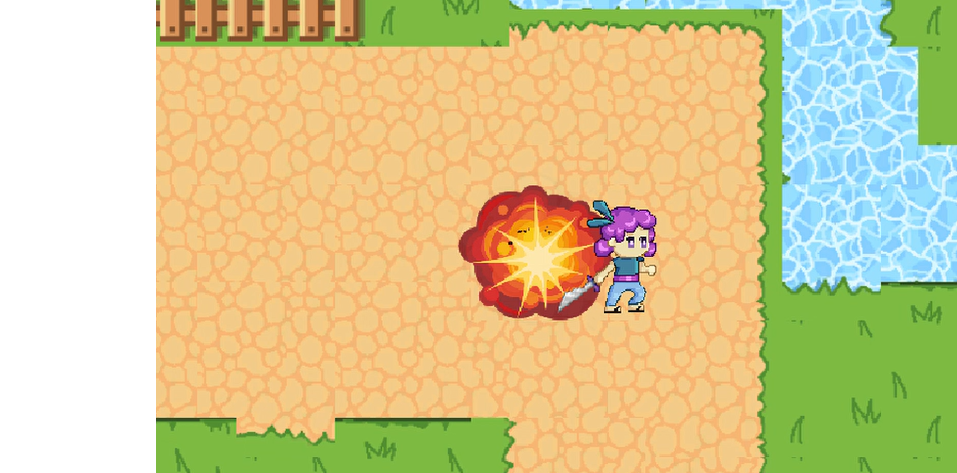 Fig 2.3
Enemy Animation
Right now, the enemy is a static ghost sprite. Lets give it some character by animating their walk cycle. (In this case, float cycle).
Add an Animator component to the Enemy. We already provide you with a ready-to-go animation located in Assets > Animations > Enemy, so you can just drag and drop that in to the controller of the animator component via the unity inspector. However, if you would like to get some experience working with the animator and blendtrees (which you’ll do a lot), delete the Enemy controller and follow the video below to make your own animation.
https://youtu.be/I9JG9kU17RI?si=lWHJnjz5SdM0bKCG&t=1613
Prefabing your Enemy
Good job on creating your foe! You’ve crafted an adorable floating green ghost who, if you get too near, will chase after you and explode if it gets too close. Now, its time to scatter your newly created enemy prefab around the map. Please decorate to your heart’s content!
In your hierarchy, create an empty GameObject called Enemies, and drag each Enemy into this empty object. This keeps your Hierarchy clean and organized!
As the curtains draw close on the stage of life’s battles, let us not forget the invaluable role played by our adversaries. They are not merely obstacles to be overcome, but essential partners in our journey of self-discovery and growth. Through their opposition, we find the crucible where our character is tested and refined. Let us embrace this intricate dance with resilience, for it is in facing our foes that we unearth the depths of our strength and emerge victorious, not only over them but over our own limitations as well.
Section 3: Health and Damage
In this fleeting pursuit for glory we call a game, the player and the enemy wish only to vanquish the other in glorious combat. But without the foundation of a fair fight, health and damage systems, neither side could hope to triumph over the other.
Our goal for this section is to allow the player and enemy to defeat each other during the game as they exchange successful attacks.
Health System
Summary:
- Update the PlayerController and Enemy scripts to store health and damage for both enemies and players.
- Send damage values from the players to the enemies when an attack lands, and vice versa.
Open the PlayerController script and take a look under the region called Health_variables.
#region Health_variables
public float maxHealth = 5;
float currHealth = 5;
#endregion
currHealthholds the player’s current amount of health.maxHealthholds the maximum amount of health that the player can hold at one time.
Now, scroll down to the Health_functions region, where three functions have been set up for you. These functions are responsible for changing the player’s health as the player either takes damage or heals damage. You will be implementing two of these functions.
#region Health_Functions
//take damage based on value param passed in by caller
public void TakeDamage(float value){
    //TO BE IMPLEMENTED
}
//heal player
public void Heal(float value){
    //TO BE IMPLEMENTED
}
#endregion

//destroy player object and triggers end scene
private void Die(){
    Destroy(this.gameObject);
}
Task 3.1: Implement TakeDamage(), and Heal() in the PlayerController script. Implement TakeDamage(), in the Enemy script.
- Using the
valueparameter, changecurrHealthinside of theTakeDamage()andHeal()functions depending on if the player is receiving damage or healing damage.- Call the
Die()function whenever the player receives too much damage. - Limit
currHealthtomaxHealthwhen healing damage, since we do not wantcurrHealthto surpassmaxHealthwhen implementing the health bar. - Add a
Debug.Log()toTakeDamage(), containing a message that displayscurrHealth’s value for debugging purposes. - In the
Awake()function of PlayerController.cs, setcurrHealthequal tomaxHealth. This ensures that the player starts with a full health bar when the game starts.
- Call the
- In the
Enemyscript, implementTakeDamage()using the same code logic in thePlayerControllerscript.
Functions to modify:
PlayerController.cs -> TakeDamage(), Heal(), and Awake()
Enemy.cs -> TakeDamage()
Below is the hex code for the solution.
Solution: 68 74 74 70 73 3A 2F 2F 79 6F 75 74 75 2E 62 65 2F 72 59 4A 52 31 41 34 4B 4F 67 6B 3F 6C 69 73 74 3D 50 4C 6B 54 71 66 35 44 42 7A 50 73 41 65 2D 70 52 35 62 44 55 64 77 48 69 43 4E 67 48 63 79 42 49 68 26 74 3D 31 31 30
Now, both the enemy and the player have a functional health system, but they do not have a way to damage one another. To add a damage system, we will be using 2D raycasts.
Damage System
Head to the AttackRoutine() function within the PlayerController script. This function is called whenever the player attacks. Within the foreach loop, the player object is checking whether there are any objects with the Enemy tag inside of the attack hitbox, and returning any objects that it finds.
RaycastHit2D[] hits = Physics2D.BoxCastAll(PlayerRB.position + curr_direction, Vector2.one, 0f, Vector3.zero);

foreach(RaycastHit2D hit in hits){
    Debug.Log(hit.transform.name);
    if (hit.transform.CompareTag("Enemy")){
        Debug.Log("Tons of damage");
        //TO BE IMPLEMENTED
    }
}
Task 3.2: Fill in the logic for AttackRoutine() in the PlayerController script and Explode() in the Enemy script.
- Using the
transform.CompareTag()function, call theTakeDamage()function inside of the enemy’sEnemyscript.- The variable
hitrefers to the GameObject of an enemy within the player’s attack hitbox. - This may be a good time to use the
GetComponent<>()function!
- The variable
- In the
Enemyscript, callTakeDamage()inside of the player’sPlayerControllerscript through theExplode()function.- Additionally, destroy the enemy GameObject when the enemy hitbox finds its target.
- Look at the code from PlayerController and take note of how they access variables from GameObjects that are caught in the raycasts.
- Make sure that you’re not using the
Playertransform variable.
Functions to modify:
PlayerController.cs -> AttackRoutine()
Enemy.cs -> Explode()
Below is the hex code for the solution.
Solution: 68 74 74 70 73 3A 2F 2F 79 6F 75 74 75 2E 62 65 2F 72 59 4A 52 31 41 34 4B 4F 67 6B 3F 6C 69 73 74 3D 50 4C 6B 54 71 66 35 44 42 7A 50 73 41 65 2D 70 52 35 62 44 55 64 77 48 69 43 4E 67 48 63 79 42 49 68 26 74 3D 35 36 37
Now the enemy and player in our game can deal damage and kill each other. Adjust the maxHealth value of the player in the inspector to test out if the player takes damage as expected, and they die if, and only if, the player reaches 0 health.
Section 4: Health UI
What is a sword without its scabbard? Functional, sure, but without something to keep it contained, it will be always hanging out of place.
During the last section, we have successfully created a health and damage system for the player and the enemies. But as of right now, the player has no way of knowing how much health they have at any given moment.
In this section, we will be using Unity’s UI (User Interface) components to create a health bar for our game that displays the amount of health that the player has. In a way, we’ll be making the scabbard to our gameplay.
Health Bar
Summary:
- Create a health bar and place it within the scene.
- Getting the health bar to change dynamically depending on the player’s health.
Make sure to set your player’s health to at least 5 so that it does not die to one enemy attack.
Right click on the Hierarchy and select UI > Canvas. This will create a Canvas object that will store all of your UI elements, along with an EventSystem object that manages interactions between the player and the UI. Do not delete the EventSystem object.
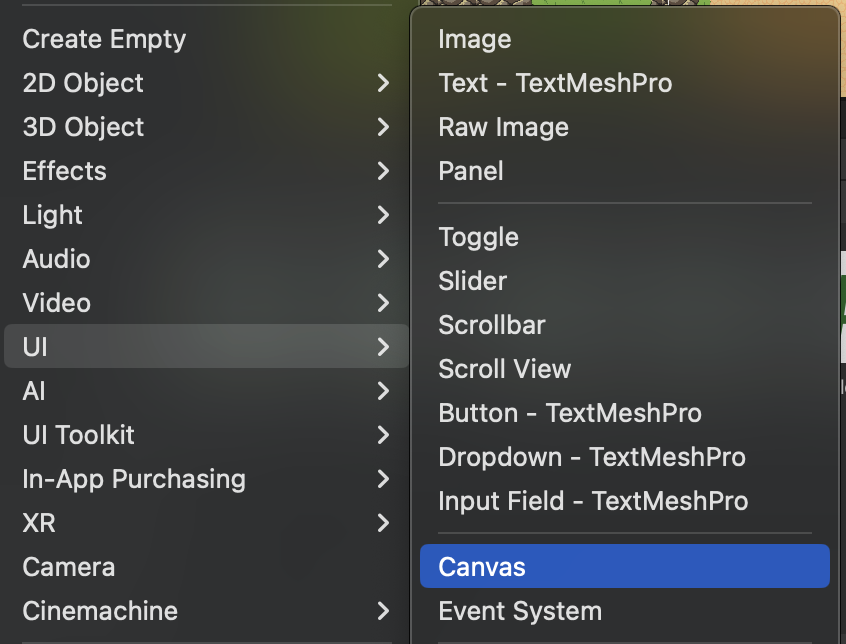 Fig 4.1
With the Screen Space - Overlay setting on the Canvas object, all UI elements within the Canvas will be rendered on the player’s screen above the game world. This will suit our needs of a health bar being visible to the player at all times. If you decide on adding more UI elements in the future, such as a points system or a second resource bar, they will also be displayed on top of the game world as long as they are stored inside of the Canvas object.
To make our health bar, we will be using a Slider object. Right click on the Canvas object and select UI > Slider. A slider should appear in the middle of your Scene view as a child to the “Canvas” object in the hierarc.
Rename this slider to HPSlider and click on the crosshair under the RectTransformcomponent. Hold Shift and Alt (or Shift and Option if on Mac) while clicking on the anchor preset on the top left. This should anchor your slider to the top left of the screen. To keep it from hugging the top left corner of the screen too tightly, change the X and Y positions to 5 and -5 respectively. (You are free to adjust the Width and Height of the health bar to make the bar take up more space on the screen.)
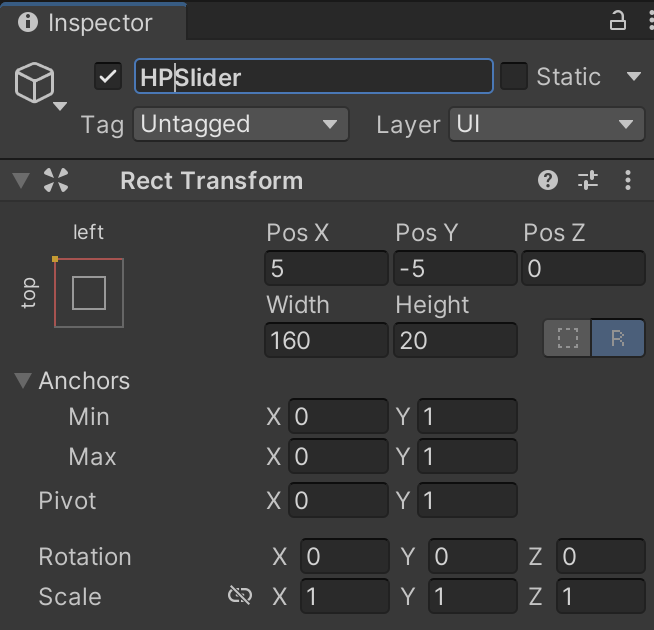 Fig 4.2
Your slider object’s transform should look something like this.
Slider objects can be placed within a settings menu for the player to change volume and more, but they can also be used for progress bars and resource bars. A key difference is whether the slider can be interacted with by the player or not.
Under the HPSlider object, there are three children objects titled Background, Fill Area, and Handle Slide Area. For our health bar, we do not need our slider to be interactable, so you can delete the Handle Slide Area object. Click on the Fill Area object and change the Left and Right transforms to 0. Next, click on the Fill object under the Fill Area and change the Width transform to 0. This is to allow the fill area to reach both sides of the slider completely.
We can also change the color of the slider to represent health more clearly. Look for the Fill object under the Fill Area object, and change the color to whatever color you think represents health the best (Red is typically the standard for video games). Change the color of the Background object to a darker or lighter shade of Fill Area’s.
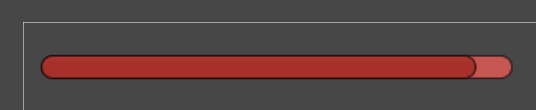 Fig 4.3
Your slider should look something like this. Move the value slider in the Slider component of the HPSlider object between 0 and 1 to make sure that the health bar depletes completely and reaches the maximum.
Now, we have to connect the player’s health to the health bar with the power of scripting. Head to PlayerController.cs and add using UnityEngine.UI; to the top of the script so that we can access Unity’s UI components from the code. Under the health_variables region, create a public Slider variable titled HPSlider, which will hold a reference to the health bar in the scene itself.
Next, you will make the health bar move depending on the player’s health in PlayerController.cs.
Task 4.1: Update Awake(), TakeDamage(), and Heal() to support UI functionality.
- In
Awake(), setHPSlider.valueto a ratio between the player’s current health and maximum health.- This is to make sure the scene loads in with the correct amount of health displayed.
- Update
HPSlider.valueinTakeDamage()andHeal()underHealth_functionsthe same way as inAwake().- The order that you update UI variables matters! Make sure that the correct values are being displayed in the scene.
Functions to modify:
PlayerController.cs -> Awake(), TakeDamage(), and Heal()
Below is the hex code for the solution.
68 74 74 70 73 3A 2F 2F 79 6F 75 74 75 2E 62 65 2F 50 37 41 5F 30 36 50 62 2D 45 38 3F 6C 69 73 74 3D 50 4C 6B 54 71 66 35 44 42 7A 50 73 41 65 2D 70 52 35 62 44 55 64 77 48 69 43 4E 67 48 63 79 42 49 68 26 74 3D 34 30 37Head back to your Scene view and drag the HPSlider object to the
HPSlidervariable in the Player object. Test the game to see if the health bar displays the correct ratio of health when the game starts and when you take damage from an enemy.
Section 5: Sound and Camera
In this section, you will handle all the sound aspects of the project, along with a couple bits and pieces that we need to pick up before moving on.
Audio
First, enable the AudioManager object in the Hierarchy. Then, in your Player script, add the sounds where you want it to be played. In order to do this, you will need to add this line of code to where you want the sound to be played: FindObjectOfType<AudioManager>().Play("SoundName");.
In order to enable game objects: select the object you would like to enable in your hierarchy, then check the box located at the top left of your inspector.
To find the names of each sound, go into the AudioManager object, and click on each sound dropdown to find the Name field. You will need to add this line for each sound in their respective locations. The link to the tutorial with the timestamp can be found below.
Task 5.1: Implement all sounds listed in the AudioManager in their respective places
Here is a list of the sounds you’ll need to implement:
- PlayerHurt
- PlayerDeath
- Explosion
- EnemyHurt
- PlayerAttack
Make sure to play the sound before the object is destroyed, or else it will not play!
Potions are not yet implemented, so there is no need to add the potion effect. You will implement the sound for the potion during the next section.
Below is the hex code for the solution.
68 74 74 70 73 3A 2F 2F 79 6F 75 74 75 2E 62 65 2F 41 6D 6F 49 5A 34 41 55 75 72 45 3F 6C 69 73 74 3D 50 4C 6B 54 71 66 35 44 42 7A 50 73 41 65 2D 70 52 35 62 44 55 64 77 48 69 43 4E 67 48 63 79 42 49 68 26 74 3D 36 37
Bits and Pieces
Now, we want the camera to move with the player. So, click on the CM vcam1 object in the Hierarchy, and check it. Then, in the CinemachineVirtualCamera component, drag your Player object into the Follow area. Then, go into the Main Camera and check the CinemachineBrain component. You should now be able to play the game with the camera centered on the player, as you explore the map.
Now, you should be able to play your game in the map, and have sound effects along with it!
Section 6: Pickups
In this section, you will implement a chest object and a health potion object, then program the functionality to open these chests and receive health potions.
Summary:
- Create a health potion GameObject that heals the player’s health when the player walks over it
- Create a chest that drops health potions when the player opens it
Setting Up Chest and HealthPack
Right click in the hierarchy to create a new sprite GameObject 2D Object > Sprite and rename it to Chest. Then, follow these steps:
-
In your project’s directory, navigate to
Assets > Sprites > Itemsand drag the chest sprite into the SpriteRenderer component’s Sprite box. Alternatively, you can click on the circle next to the Sprite box and search the name chest. -
Inside the SpriteRenderer component, look under “Additional Settings”, set the Sorting Layer to Enemy.
{. note}
We are setting the sorting layer to Enemy so the chest sprite appears above the environment layer
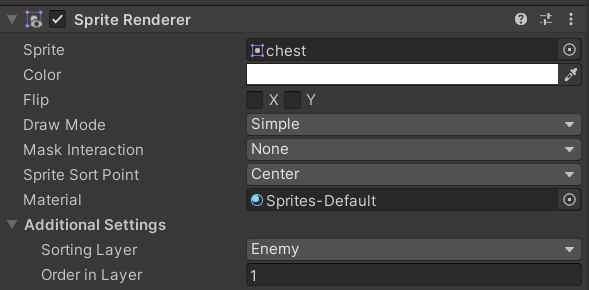 Fig 6.1
- Add a Rigidbody2D component and a BoxCollider2D component. Change the Rigidbody 2D’s body type to Kinematic. Kinematic means this game object is unaffected by gravity and can only be moved by script manipulation. Additionally, freeze both x and y positions as well as the z rotation.
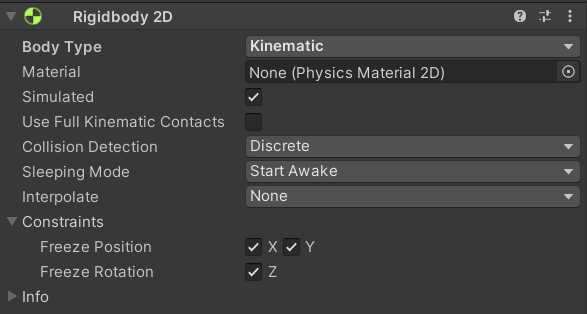 Fig 6.2
Now, create another sprite GameObject and name it HealthPotion. Repeat the following steps above for HealthPotion, while making sure to check the IsTrigger checkbox under the BoxCollider2D component.
Health Pack Script
Navigate to the Scripts folder Assets > Scripts and attach the HealthPotion.cs script to your HealthPotion GameObject. Double click the script to edit it.
#region HealthPotion_variables
[SerializeField]
[Tooltip("amount the player heals")]
private int healAmount;
#endregion
healAmountwill be the amount of health recovered once the user walks over the health potion.ToolTipwill display the message it holds when the user hovers over the healAmount variable in the unity inspector
When a player walks over a health potion, it should boost their health points and disappear; signaling to the player that the potion has been used.
Task 6.1: In HealthPotion.cs fill in the OnTriggerEnter2D() function so the player gains healAmount of health when collided with. Add the potion sound to your script as well.
Functions to modify:
HealthPack.cs -> OnTriggerEnter2D()
Below is the hex code for the solution.
68 74 74 70 73 3A 2F 2F 79 6F 75 74 75 2E 62 65 2F 50 6C 77 31 4F 30 55 75 5F 7A 51 3F 73 69 3D 66 74 31 61 6D 35 71 64 4F 6C 6E 77 58 37 70 52 26 74 3D 32 37 39
Attach the HealthPack.cs script to your HealthPotion GameObject. You can test out your implemention by using a Debug.Log() statement to print out your currHealth inside PlayerController.cs’s Heal() function and walking over the health potion with your player.
Finally, drag your HealthPotion GameObject into Assets > Prefabs to turn it into prefab.
Chest Script
Change the Chest GameObject’s tag to Chest. Navigate to the Scripts folder again and add the Chest.cs script to your Chest GameObject. Double click the script to edit it.
Notice we only have a tag for chests but not potions. This is because the tag will be needed for interactions between the player and chest but the player will not be interacting with the potion besides collison detection.
Under the region Healthpack_variables, create a variable with type GameObject and name it healthPotion. Make sure it is public. We will use this reference to spawn health packs when chests are opened.
When a player interacts with a chest, the chest should disappear, leaving behind a health potion for the player to pick up.
Task 6.2: ImplementDestroyChest() which destroys a chest and leaves in-place a Health Potion.
Functions to modify:
Chest.cs -> DestroyChest()
Below is the hex code for the solution.
68 74 74 70 73 3A 2F 2F 79 6F 75 74 75 2E 62 65 2F 50 6C 77 31 4F 30 55 75 5F 7A 51 3F 73 69 3D 51 6B 57 44 64 42 45 6B 6D 47 41 52 53 64 65 62 26 74 3D 34 35 35
Back in the Unity editor, with Chest selected, drag and drop a reference to the HealthPotion prefab into this variable via the Unity inspector. Then, make your Chest into a prefab.
You won’t be able to test your implemention until you’ve finished the next task.
Interacting with Pickups
We just implemented the Open() function for Chest, that when called, destroys the Chest game object and leaves in its place a Health Potion.
As of right now, we can’t interact and open the chest. Let’s implement that functionality in this section.
The Open() function should be called whenever the player presses “E” on a chest.
First, open up the PlayerController.cs script and add a conditional if statement inside the Update() function to repeatedly check if the player presses the “E” key. If the “E” key is pressed, call the PlayerController’s Interact() function; we shall implement the functionality of this function in the next step.
/* PlayerController.cs */

void Update() {
    if (Input.GetKeyDown(KeyCode.E)) {
        Interact();
    }
}
Still inside the PlayerController.cs script, navigate down to the Interact() function. This function, when invoked, will check if the player is facing a chest, if so, it will call that particular Chest instance’s Open() function to drop a Health Potion.
Task 6.3: Implement Interact(): use a BoxCastAll to check if the player is facing a Chest game object if so, call that Chest’s Open() function.
Functions to modify:
PlayerController.cs -> Interact()
BoxCastAll()works the same asCircleCastAll()but raycasts in the shape of a rectangle instead of a circle. We highly reccommend reading over the documentation here: https://docs.unity3d.com/ScriptReference/Physics.BoxCastAll.html. For the size parameter we used 0.5f for both its width and height. Keep in mind we want to cast in the direction the player is facing.
Below is the hex code for the solution.
68 74 74 70 73 3A 2F 2F 79 6F 75 74 75 2E 62 65 2F 4E 74 4F 54 70 67 44 4F 7A 49 30 3F 73 69 3D 52 44 43 64 6F 46 35 74 36 68 6A 77 39 44 30 4A 26 74 3D 37 31
Now, scatter some chests into your map by dragging and dropping the Chest prefab into your scene multiple times.
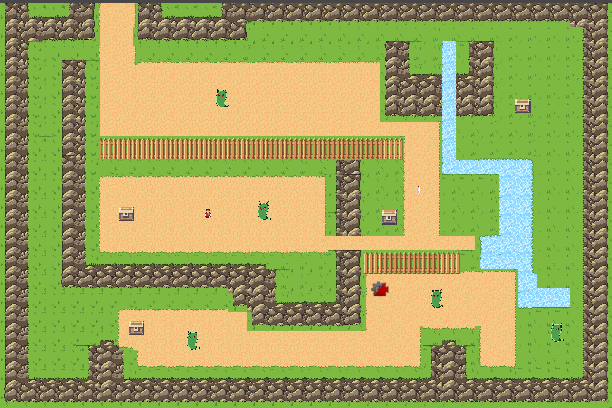 Fig 6.3
Here is a example of what your scene should look like now.
Now you should be able to walk up to the chests, press E for a health potion, and walk over the potion to gain health.
Section 7: Menu Screens
We’ve come so far, you and I. Our trials and tribulations are no match for your boundless fervor for creation, and now you stand before the beast itself, sword in hand and an intent to kill.
Now that the core gameplay has been implemented, we can now round off our game with menu screens that allow the player to navigate from opening the game to playing it and vice versa. Menu screens are a quick way to add polish to your game and improve the user experience, as well as enforcing the style or theme that your game is going for.
Summary:
- Create a GameManager script and UI assets for the GameManager to control
- Create scenes for the game to switch between and implement the scene-switching logic
Main Menu
Head to the Scenes folder in the Inspector, and right click to create a new scene with Create > Scene. Name this scene MainMenu, and open the scene. Create a Canvas (this will also make an EventManager), and name it MainMenuCanvas.
Create a Text object under the new canvas and name it TitleText. Increase the font size to 40, and change both alignments to the centered option. Change the text to your game’s title. (You can choose this name! If you don’t care, call it Awesome Game)
Create an Image under MainMenuCanvas and drag it above TitleText in the Hierarchy. Click on the Anchor Preset box on the top left of the RectTransform component and click on the bottom right box with 4 blue arrows extending outwards. Change the Left, Right, Top, and Bottom transforms to 0 to stretch the image toward the edges of the screen. These values determine the offset between the respective side of the screen and the asset.
 Fig 8.1
Change the Color of the image to your choice of background color. Notice how the text now renders in front of the image in the Game view because we moved the Text object above the Image object.
Add a Button object to the MainMenuCanvas and lower the button either in the scene or by changing the Y position to -75 in the Inspector. Access the Text object, the child of Button, and change the text to “Start Game”.
Win and Lose Screens
Task 7.1: Create two more scenes, WinScene and LoseScene, that will show up when the win and lose conditions are met respectively.
Both scenes, at minimum, will have the same components as the MainMenu scene, so you can duplicate the scenes to save some time. Make sure to change the components and rename the scene so that they are distinct from the main menu, and that you don’t confuse yourself when hopping from scene to scene when you’re editing.
Below is the hex code for the solution.
68 74 74 70 73 3A 2F 2F 79 6F 75 74 75 2E 62 65 2F 41 33 78 35 69 50 6A 36 6A 6C 63 3F 6C 69 73 74 3D 50 4C 6B 54 71 66 35 44 42 7A 50 73 41 65 2D 70 52 35 62 44 55 64 77 48 69 43 4E 67 48 63 79 42 49 68 26 74 3D 34 39
Scene Management
To hold all of the scene management code, we will be using a GameManager script. The GameManager script is typically where, as the name suggests, most of the game management code is stored. Since most of the code that maintains the gameplay has been delegated to other scripts, this GameManager script will control scene management.
Open the GameManager script and take a look at the code below:
public static GameManager Instance = null;

#region Unity_functions
private void Awake()
{
    if (Instance == null)
	{
		Instance = this;
	} else if (Instance != this) {
		Destroy(this.gameObject);
	}
	DontDestroyOnLoad(gameObject);
}
#endregion
- The if block checks if a
GameManagerscript exists already:- If it doesn’t, it assigns itself to a reference that can be accessed in other scripts.
- If it does, it destroys itself, the GameObject, to prevent itself from overwriting the existing
GameManager.
- After the if statement, it makes sure that the
GameManageris not deleted when the game switches between scenes, so that scripts can continue to referenceGameManager.
Why put so much effort into maintaining a proper GameManager script? GameObjects are typically not supposed to persist between scenes. However, the GameManager script tends to hold important variables that correspond to all parts of the game, from scores to player information and even sound settings. Keeping a single version of the GameManager script by using the line DontDestroyOnLoad(gameObject) lets the game retain its own information so that it can be used all throughout the game’s different scenes.
Once you’ve looked at the code above, add using UnityEngine.SceneManagement; to the top of the script. Importing the SceneManagement package allows us to access specific functions to move between scenes in the game.
Scroll down to the Scene_transitions region containing four empty functions; StartGame(), LoseGame(), WinGame(), and MainGame(). Each of these functions will run whenever a scene change is needed.
Task 7.2: Implement StartGame(), LoseGame(), WinGame(), and MainGame().
- Using
SceneManager.LoadScene(), fill in the functionsStartGame(),LoseGame(),WinGame(), andMainGame().SceneManager.LoadScene()uses one string argument, which is the name of the scene that needs to be loaded.- Each function above should load to a different scene. Scene names are CASE SENSITIVE, so double-check your spelling and cases first if you run into issues.
Functions to modify:
GameManager.cs -> StartGame(), LoseGame(), WinGame(), and MainGame().
Below is the hex code for the solution.
68 74 74 70 73 3A 2F 2F 79 6F 75 74 75 2E 62 65 2F 78 44 64 31 50 46 44 7A 4E 57 55 3F 6C 69 73 74 3D 50 4C 6B 54 71 66 35 44 42 7A 50 73 41 65 2D 70 52 35 62 44 55 64 77 48 69 43 4E 67 48 63 79 42 49 68 26 74 3D 32 30 37
You have successfully implemented the necessary functions within the GameManager script to navigate through the UI! Attach the GameManager script to the GameManager object and turn the object into a prefab.
We will now hook up the functions to the buttons in each scene. Access the StartButton object under MainMenuCanvas and scroll to the Button component, where you’ll find an OnClick() box. Click the plus sign at the bottom right so that the box looks like the figure below. If it already looks like the figure, you do not need to add a second function.
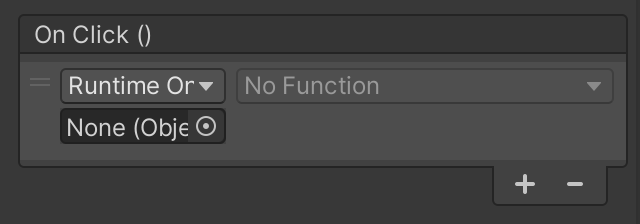
Drag the GameManager prefab into the empty object slot, and select GameManager > StartGame() on the dropdown menu. Now when the button is clicked, the StartGame() function will execute.
An important step is to head to File > Build Settings and click on the Add Open Scenes button under Scenes In Build. This will add MainMenu to the build, which will allow SceneManager to access the scene in order to switch to it.
SceneManagerfunctions can only access scenes that are contained in the build. Add scenes that you want to access into the build before testing out theSceneManagerfunctions.
Run the scene and click on the “Start Game” button, ensuring that the game transitions into the main game scene, or SampleScene. Go ahead and switch to the other scenes as well and make sure that their respective buttons move to the right scenes.
Now, we will implement the rest of the transition functions. Open the EndTriggerScript script and look at the method below:
private void OnTriggerEnter2D(Collider2D coll)
{
	if (coll.CompareTag(“Player))
	{
		gameObject gm = GameObject.FindWithTag(“GameController”);
		gm.GetComponent<GameManager>().WinGame();
	}
}
Since the EndTriggerScript script is attached to an invisible GameObject with a BoxCollider2D component, the method OnTriggerEnter2D() concludes the game when the player reaches the goal.
First, it searches the Hierarchy for a GameObject with the GameController tag. The only GameObject that should have this tag is the GameManager object.
Afterwards, it accesses WinGame() from the GameManager script, thereby moving the scene to WinScene.
Task 7.3: Trigger a game over by moving the current scene to LoseScene when the lose condition is met.
- Using this method of ending the game, implement a lose condition in the
PlayerControllerscript.- The game should end when the player’s health reaches 0.
- The current scene should move to the scene titled LoseScene.
Functions to modify:
GameManager.cs -> ???
Hint: Think of what typically triggers game overs in video games, and look for the function in the script that supports this game over.
Below is the hex code for the solution.
68 74 74 70 73 3A 2F 2F 79 6F 75 74 75 2E 62 65 2F 41 69 68 54 49 45 32 67 2D 6C 55 3F 6C 69 73 74 3D 50 4C 6B 54 71 66 35 44 42 7A 50 73 41 65 2D 70 52 35 62 44 55 64 77 48 69 43 4E 67 48 63 79 42 49 68 26 74 3D 35 38
Give yourself a pat on the back! You have a super mega epic video game of the year triple AAA worthy in your hands!!! Upload your project onto a respository, fill out the Project 1 form on the Decal website, and go take a breather. The facilitator team grants you permission to do so.
Submission
Ensure that your github repo is private and invite berkeleyGameDev as a collaborator.
Your base project should be able to be played without compiler errors. If there is an error that prevents the project from being graded, you will be notified after submission and given 24 hours to send corrections so that it is playable.
Do not add new content. If we see that there has been new content added in your corrected version, you will receive an automatic NP grade.
After projects have been graded, you will receive feedback on your project.
Part 1 Due Thursday, 9/18 @ 6:59 PM.
Bug Reports
If you find any bugs or typos within the project, please report it here!